# Welcome

## **Welcome to the Donary DRM Help Center!**

## <mark style="color:$primary;">Here you’ll find guides, tips, and examples to help you get the most out of your Donary DRM</mark> <mark style="color:$primary;">platform.</mark>

<table data-view="cards"><thead><tr><th align="center"></th><th data-hidden data-card-cover data-type="image">Cover image</th><th data-hidden data-card-target data-type="content-ref"></th></tr></thead><tbody><tr><td align="center"><p><i class="fa-flag" style="color:$primary;">:flag:</i></p><p><strong>Getting Started</strong></p></td><td></td><td><a href="/pages/YLYG96uao2kS9CUINI8B">/pages/YLYG96uao2kS9CUINI8B</a></td></tr><tr><td align="center"><p><i class="fa-map-location" style="color:$primary;">:map-location:</i></p><p><strong>Overview</strong></p></td><td></td><td><a href="/pages/WpoD0BxpTaFcWYs5Joal">/pages/WpoD0BxpTaFcWYs5Joal</a></td></tr><tr><td align="center"><p><i class="fa-book-open" style="color:$primary;">:book-open:</i></p><p><strong>Usage &#x26; Examples</strong></p></td><td></td><td><a href="/pages/xEmwPEONBpsqbDzauRKs">/pages/xEmwPEONBpsqbDzauRKs</a></td></tr></tbody></table>

***

<mark style="color:$primary;">**Navigate with ease!**</mark>

{% embed url="<https://drive.google.com/file/d/1NqPcqman-G5b4-HLmYeK4ED_QWFPh7CG/view?usp=sharing>" %}


# Getting Started

Here you’ll find everything you need to get set up and start using the platform with confidence. **Browse by category or use search to quickly find the answers you’re looking for.**

<table data-view="cards"><thead><tr><th align="center"></th><th data-hidden data-card-target data-type="content-ref"></th></tr></thead><tbody><tr><td align="center"><p><i class="fa-magnifying-glass-location" style="color:$primary;">:magnifying-glass-location:</i></p><p><strong>User Interface</strong></p></td><td><a href="/pages/TglRbAmqR2Qgknn9fL4r">/pages/TglRbAmqR2Qgknn9fL4r</a></td></tr><tr><td align="center"><p><i class="fa-clipboard-list" style="color:$primary;">:clipboard-list:</i></p><p><strong>Setup &#x26; Configuration</strong></p></td><td><a href="/pages/pQmCSeitnQ0mIRgZwSp9">/pages/pQmCSeitnQ0mIRgZwSp9</a></td></tr><tr><td align="center"><p><i class="fa-clipboard-check" style="color:$primary;">:clipboard-check:</i></p><p><strong>Pre-Start Checklist</strong></p></td><td><a href="/pages/u9nCdtvdVHzoCJCUnSYB">/pages/u9nCdtvdVHzoCJCUnSYB</a></td></tr></tbody></table>


# User Interface

This article gives a brief overview of the main sections and interface you see after signing in to the DRM platform.

## Overview&#x20;

<figure><img src="/files/yuK9OWjw0MkRksN5zT2w" alt=""><figcaption></figcaption></figure>

**The DRM interface is divided into 4 sections:**

**A** - Main Panel&#x20;

**B** - Side Bar

**C** - Quick Actions

**D** - Personal Account information&#x20;

{% hint style="info" %}
**Section A** serves as the main display area within the application interface, and it changes based on the user's interaction and navigation choices.&#x20;
{% endhint %}

{% hint style="info" %}
**Sections B, C, and D** are designed as persistent interface elements. They are fixed and remain continuously visible throughout the DRM experience. Their permanent visibility ensures users always have access to these essential controls.
{% endhint %}

<mark style="color:$primary;">**Now, let's explore each of these sections in more detail:**</mark>

***

### Section A - Dashboard

When you first open the DRM, you are brought to the **Dashboard**, which serves as the default view in the Main Panel.

The Dashboard is designed as an **Executive Overview**, giving you an immediate snapshot of your organization’s current activity and operational status. Rather than a static display, this view is dynamically updated to reflect real-time data.

Think of the Dashboard as your **central command center** - it provides essential context so you can quickly assess overall performance without navigating deeper into the system.

***

### Section B - Sidebar

The sidebar is your navigation hub, located on the left side of your screen.

* <mark style="color:$primary;">**Donary Logo**</mark>

&#x20;Clicking the Donary logo in the top-left corner will return you to the default [Dashboard ](#section-a-dashboard)view.&#x20;

* <mark style="color:$primary;">**Collapse / Expand Sidebar**</mark>

Clicking the three-bar icon collapses the sidebar, hiding all categories and expanding the main workspace. This is useful when you need more screen space.

* <mark style="color:$primary;">**Categories**</mark>

Below the Donary logo is a list of categories. Click on a category to navigate to that specific section.

***

### Section C - Quick Actions

The [Quick Actions](#overview) section lets you perform common tasks from anywhere in the system.

<figure><img src="/files/xz1fY8XVVIv8uzAyLErc" alt=""><figcaption></figcaption></figure>

<mark style="color:$primary;">**1.**</mark> <mark style="color:$primary;">**Change language**</mark> <img src="/files/mTvsKg1qZCLCwjfubP8I" alt="" data-size="line">

Click on this icon to easily toggle between English and Hebrew. &#x20;

<mark style="color:$primary;">**2. Create**</mark> <img src="/files/u5Hz2NTslzWhvPuH328T" alt="" data-size="line">

The **Create** menu allows you to add new records without navigating to a specific section.

<table data-view="cards"><thead><tr><th align="center"></th><th align="center"></th><th data-hidden data-card-cover data-type="image">Cover image</th></tr></thead><tbody><tr><td align="center"><a data-footnote-ref href="#user-content-fn-1"><strong>נדרים ונדבות</strong></a></td><td align="center">Add new נדרים ונדבות with specified details. </td><td><a href="/files/24vsmvxsd0RHAXni8WbL">/files/24vsmvxsd0RHAXni8WbL</a></td></tr><tr><td align="center"><a data-footnote-ref href="#user-content-fn-2"><strong>Donors</strong></a></td><td align="center">Add new donors with all related details here.</td><td><a href="/files/AJnSNZOYtjWSG0NxjhA0">/files/AJnSNZOYtjWSG0NxjhA0</a></td></tr><tr><td align="center"><a data-footnote-ref href="#user-content-fn-3"><strong>Reasons</strong></a></td><td align="center">Add new reasons with all relevant details here.</td><td><a href="/files/mLyCyDacgYtQAsHJDsBr">/files/mLyCyDacgYtQAsHJDsBr</a></td></tr><tr><td align="center"><a data-footnote-ref href="#user-content-fn-4"><strong>Campaigns</strong></a></td><td align="center">Add new campaigns with all relevant details here.</td><td><a href="/files/4ANaVUlVkr0PhqfGeHqh">/files/4ANaVUlVkr0PhqfGeHqh</a></td></tr><tr><td align="center"><a data-footnote-ref href="#user-content-fn-5"><strong>Locations</strong></a></td><td align="center">Add new Locations with all important details here. </td><td><a href="/files/JvPbsFGvJ0AUpanaCAcD">/files/JvPbsFGvJ0AUpanaCAcD</a></td></tr><tr><td align="center"><a data-footnote-ref href="#user-content-fn-6"><strong>Collectors</strong></a></td><td align="center">Add new collectors with all relevant details here.</td><td><a href="/files/sxEu5a5lcrYyNauOJc78">/files/sxEu5a5lcrYyNauOJc78</a></td></tr></tbody></table>

<mark style="color:$primary;">**3. New Transaction**</mark> <img src="/files/cOsuzOR3hSuzpzmNz1SD" alt="" data-size="line">

Add **new** transactions with all relevant details here.&#x20;

<mark style="color:$primary;">**4. System updates**</mark> <img src="/files/cvDu6uTbPpStq90kuA5y" alt="" data-size="line">

Check out new system updates here!&#x20;

<mark style="color:$primary;">**5. Request New Feature**</mark> ![](/files/lq4O80GugbVggzs7yUa6)

Have an idea or suggestion? Click this icon and submit the feature request form.

<mark style="color:$primary;">**6. Help & Feedback**</mark> ![](/files/LXGQ5cU8yQpp6RHmWxAO)

Need assistance or experiencing an issue? Click this icon to submit a support ticket.\
Please complete all fields so our team can assist you as quickly and effectively as possible.

<mark style="color:$primary;">**7. Logout**</mark> <img src="/files/5wQoq2pXfPV2z4ovS03Z" alt="" data-size="line">

Click on this icon to log out of the DRM.&#x20;

<br>

***

### Section D - Personal Account Information

This section displays your administrative account details.

<div align="left"><figure><img src="/files/aIv7YgFNhkWVVj6aSxFs" alt="" width="375"><figcaption></figcaption></figure></div>

<mark style="color:$primary;">**1. Account Information**</mark>

This section displays the User's name and Account information.<br>

<mark style="color:$primary;">**2. Webgive Page Access**</mark>

Click on the donate icon  ![](data:image/png;base64,iVBORw0KGgoAAAANSUhEUgAAADUAAAAjCAYAAAA0aUL2AAADcklEQVR4AezWvU4UURQH8BteAQrkAbTFj0YaLSnA2nIb15ZEC+3otJCE1q22tJYtKK2wUUIrD4BTwDPo/EYOudkMd4aKlYzJ3/N97vnfMzvD0rOHr/7cNSylO/hvIPW/LHXY1LCpW7yB4fG7xcu/0dHDplbXltPo9Xban7xJ344nDb7MPjT25ouNzttU15mUJTgrM3urvTflAATI9ScPrg5AlP1ud5QifhW8VBAWX11baTx6AIMM5Laem9sbSS1dDl1OF3qRcsOatjWbfj5I1dlFE0JQHjSOy/82t56m6eQgiRts/fH9VP2+SIga/PDgKPGJn/w8TXx0OPx61ORppQ/ZhU5SBnRTbY12xnvJQA4PYvLUGJ4uZkPAhsPZ97R6b5naQK34aLydDF6dnaeqvihQX9W2xKr2kV0oktLQgG1NEKrqwzxyJz9+pZ3xp2RrkWtAelUP8nF32myClBuE2DYoj4ST49N6q7Oa1HktbXclybNZcbldKJKKweab7Iz3mkMR8nj8sy+arQUxFxIbRoRfLpJ00JcvpBhbfpvOJ7cLRVIxVDTRFAF2EHKLbBD3OJLs0XiLaGDj3pjqSr9RyeLy/ObUxaMs1gdFUnkDgwYBh7rpsPM8vw1byn3yDaeHLbgsNpnn0eXy5z08rrmPDvLbUCSVNw4CDqUjNd/QQeJtfr6XW++b34d6tpcCGQiiiIeP9DaUa3O25gy2WBuKpKJ5SM0M5Lmfb9ZGyGZcjJp4bOfrwlaPlLOmk1m4G+mR1kMOhxw2vQ1lUvU3Q5FmCBmsLyF13mSIqTEIH5JunO7VTvLpL9cZfCXIK8WLpNxQXuwDmdv0eBzoORyMTO4zfBDy+AbR8LXdvhl8kPURVxOXwdeGIimDOTwKPR4QNkIxUPhCGiB0EiFvNFvXE/j14HOWXnJsTYx/f/I2IcJ2SfLC5mtDkZQChwMdkHJ4SL55IJQfbDjDyhPL+8WQVf0hD+S1ua6+DzpJaWIIoIPbRYqeo6r/evCbcKPht6G4eXFvLXbA0GpyxItCzCVEr76yFynNkPJKJh1mQH6SzS9O5w/4bvFBVW8j/F2yya//6O3Ka4v3JqW4qjdheLeKwPNH40Sy+eXMw3Di12E+nx011/WUU8KNSJUaLVJsILVI2yjNMmyqdDuLFBs2tUjbKM1yJzf1FwAA//8EhDocAAAABklEQVQDAO6IkkkjkwbxAAAAAElFTkSuQmCC) to access the Webgive page of your organization. &#x20;

Each organization has its own unique account number, making donations accessible and user-friendly to your online audience. Your organization’s account number will show here: ![](/files/MMqhnbCa1as4uRXMb4m5)

Your Webgive URL will follow this format:    *<mark style="color:$primary;">**<https://donary.com/7231>**</mark>*

{% hint style="info" %}
*The number will be replaced with your organization’s specific account number.*
{% endhint %}

***

<mark style="color:$primary;">**Donation Phone Line**</mark>

Donary provides a dedicated donation phone line at **845-DONARY3**.

Each organization is assigned a **unique extension**, which corresponds to its account number.

[^1]: These are promises to donate money - promises made when one is עולה לתורה.

[^2]: Individuals who have donated or are committed to donating money in the future.

[^3]: A team in a charity drive (Donate +). Each team has an online page with a fundraising goal.

[^4]: The cause and purpose of the donation. Every donation is directed towards a specific cause AKA campaign.

[^5]: Where the donation was made.

[^6]: AKA fundraisers. Individuals that actually collect the money and donations.


# Setup & Configuration

**First things first—let’s make sure your DRM is fully set up and ready to go.**

\
The Setup & Configuration section helps you define your system’s core settings. Each category below represents a key configuration area that should be reviewed and completed before using the platform.

<table data-card-size="large" data-view="cards"><thead><tr><th align="center"></th><th data-hidden data-card-target data-type="content-ref"></th></tr></thead><tbody><tr><td align="center"><p><i class="fa-tag" style="color:$primary;">:tag:</i></p><p><strong>Admin Profile</strong></p></td><td><a href="/pages/hrzr7gzRhsoRSCNy6EHM">/pages/hrzr7gzRhsoRSCNy6EHM</a></td></tr><tr><td align="center"><p><i class="fa-user" style="color:$primary;">:user:</i></p><p><strong>Users</strong></p></td><td><a href="/pages/r1au2jSpBa6XpO64DZy4">/pages/r1au2jSpBa6XpO64DZy4</a></td></tr><tr><td align="center"><p><i class="fa-newspaper" style="color:$primary;">:newspaper:</i></p><p><strong>Branding</strong></p></td><td><a href="/pages/RoAqOnp5VNKrnNtbPKOY">/pages/RoAqOnp5VNKrnNtbPKOY</a></td></tr><tr><td align="center"><p><i class="fa-key" style="color:$primary;">:key:</i></p><p><strong>API Keys</strong></p></td><td><a href="/pages/VT0suNGWIPU9l94mt0Va">/pages/VT0suNGWIPU9l94mt0Va</a></td></tr><tr><td align="center"><p><i class="fa-clipboard-list" style="color:$primary;">:clipboard-list:</i></p><p><strong>Settings</strong></p></td><td><a href="/pages/QHaMeWDFWX5FFfIZ4piv">/pages/QHaMeWDFWX5FFfIZ4piv</a></td></tr><tr><td align="center"><p><i class="fa-square-check" style="color:$primary;">:square-check:</i></p><p><strong>Advanced Fields</strong></p></td><td><a href="/pages/mnlwi1rLI31Ly8MMxp2w">/pages/mnlwi1rLI31Ly8MMxp2w</a></td></tr></tbody></table>


# Admin

All your Organization's information

## Overview

In the Admin category, you can define core account details, permissions, and default settings that are essential for workspace management. This helps ensure your workspace is set up, organized, and ready for all users—streamlining administrative tasks and enhancing productivity to meet your organization’s needs.

<mark style="color:$primary;">**Access the Admin section via the left sidebar.**</mark>

Under the Admin category, you will see several tabs that you must complete. Each tab requires specific information and input. We will review them one by one to ensure they are completed correctly.

Start by setting up your Admin profile:

***

## Profile

<mark style="color:$primary;">**You can access the Profile  tab via the Admin category in the left sidebar.**</mark>

The Profile section stores your organization’s essential contact information. This information appears across various documents generated by the DRM (for example, receipts, pledges, and statements), so it’s important to keep it complete and accurate.

<mark style="color:$info;">**To complete this section, perform the following steps:**</mark>

### Organization information

* Accurately fill in all required organizational details in the designated fields.&#x20;

{% hint style="warning" %}
The organization name is pre-filled based on the information provided when the account was opened and cannot be edited on this screen. To update the organization name, please contact Customer Service at 718-400-7972.
{% endhint %}

{% hint style="info" %} <mark style="color:$primary;">**Note:**</mark> <mark style="color:$primary;"></mark><mark style="color:$primary;">The details provided here will appear on every receipt, pledge, and statement created within the DRM.</mark>
{% endhint %}

### Contact information

* Enter the organization’s contact information in the appropriate fields.
* To add more contact details, such as an additional phone number or email address, click the "+" icon.

{% hint style="success" %}
The email addresses provided will be used as the default "reply-to" addresses for all emails sent by the system. This means that when a donor replies to an email from the Donary system, the response will go directly to you.
{% endhint %}

{% hint style="info" %} <mark style="color:$primary;">**Note**</mark><mark style="color:$primary;">: This information is required in case we, at Donary, need to contact you.</mark>
{% endhint %}

<mark style="color:$warning;">**Important:**</mark> <mark style="color:$warning;"></mark><mark style="color:$warning;">Before moving to the next tab, click</mark> <mark style="color:$warning;"></mark><mark style="color:$warning;">**Save**</mark> <mark style="color:$warning;"></mark><mark style="color:$warning;">to confirm your changes.</mark>

<figure><img src="/files/HMLhMn8ihiGU5sVZeKzb" alt=""><figcaption><p>Fill in Admin Profile - Click on image to enlarge</p></figcaption></figure>


# Users

## Overview

<mark style="color:$primary;">**You can access the Users tab via the Admin category in the left sidebar.**</mark>

Manage all platform users, their roles, and access levels here. This enables effective account management by ensuring each user has the appropriate, customized permissions. Adjust access as needed to maintain security and operational efficiency, restricting sensitive information to only those who require it.

***

## User Features

### Add User

Only the Donary admin can create new user accounts in the DRM. Organizations cannot add users. However, organizations are authorized to modify an existing user's permissions and credentials. For details on access levels, refer to the User’s permissions section below.

To add a user, please reach out to your Donary representative today.

***

### Remove User

• Select the desired users’ email/username.&#x20;

• The “Edit user” window will appear.&#x20;

• Select “Remove user” in the bottom left hand corner.&#x20;

<figure><img src="/files/V5PqH7Af87BgwAAWPL17" alt=""><figcaption><p>Remove a user - Click on image to enlarge</p></figcaption></figure>

{% hint style="danger" %}
**NOTE**! This action cannot be reversed.&#x20;
{% endhint %}

***

### Edit User

• Select the email/username to access editing options&#x20;

• The “Edit user” window will appear.&#x20;

• Update desired details in the “User info” tab &#x20;

• Save changes

<figure><img src="/files/6yPAWYzE9KLVE4SeiDDd" alt=""><figcaption><p>Edit a User - Click on image to enlarge</p></figcaption></figure>

***

### User's Permissions

In this part, you will have the opportunity to define the specific permissions and access levels assigned to each  user. &#x20;

To modify user credentials, click on the user's email address or username. The “Edit user” window will appear.

<mark style="color:$primary;">**Viewable lists**</mark>&#x20;

• Select the “Lists” tab. Here you can choose which lists the user will be able to view and which the user  will not be able to view.&#x20;

• Toggle to enable/disable the view for each list.&#x20;

• Save changes

<div align="left"><figure><img src="/files/MP4RmNP4Hx8ZwnkXmCm0" alt=""><figcaption></figcaption></figure></div>

<mark style="color:$primary;">**Permitted actions**</mark>&#x20;

• Select the “Add New” tab. Here you can choose which "Create" <img src="/files/u5Hz2NTslzWhvPuH328T" alt="" data-size="line"> actions the user will be able to execute and which  not.&#x20;

• Toggle to permit/block a specific action.&#x20;

• Save changes&#x20;

<div align="left"><figure><img src="/files/6AaSNYLZNIYY1TQ3Itlh" alt=""><figcaption></figcaption></figure></div>

<mark style="color:$primary;">**Viewable sections**</mark>&#x20;

• Select the “Other” tab to define the different views that the user can/cannot view. &#x20;

• Toggle each view to provide or block access to said view.&#x20;

• Save changes&#x20;

<div align="left"><figure><img src="/files/jgmyHUa85dr4uTM6xzma" alt=""><figcaption></figcaption></figure></div>

<mark style="color:$primary;">**Viewable data**</mark>&#x20;

• Select the “Selected Data” tab to be able to define which data the user will have access to. &#x20;

• Click on the dropdown of each category and choose which databases the user will be able to access.&#x20;

• Choose all desired data from each dropdown.&#x20;

• Save changes

<div align="left"><figure><img src="/files/8eNOHZm0go3MYNVmYDdR" alt=""><figcaption></figcaption></figure></div>

{% hint style="warning" %}
A user may see a campaign they do not have permission to access only when a donor makes **two separate pledges - each to a different campaign** - and both pledges are paid together in a **single payment**. In this case, the payment is associated with both pledges.

If the user has access to Campaign A, they will see the full payment transaction, including the portion allocated to Campaign B, since both pledges are tied to the same payment.

**Note:** The total amounts shown in the "Sum By: Campaign" cards above the transaction list will reflect only the campaigns included in the user’s permissions.
{% endhint %}

***

### User View adjustment&#x20;

<mark style="color:$primary;">**Show/Hide columns**</mark>&#x20;

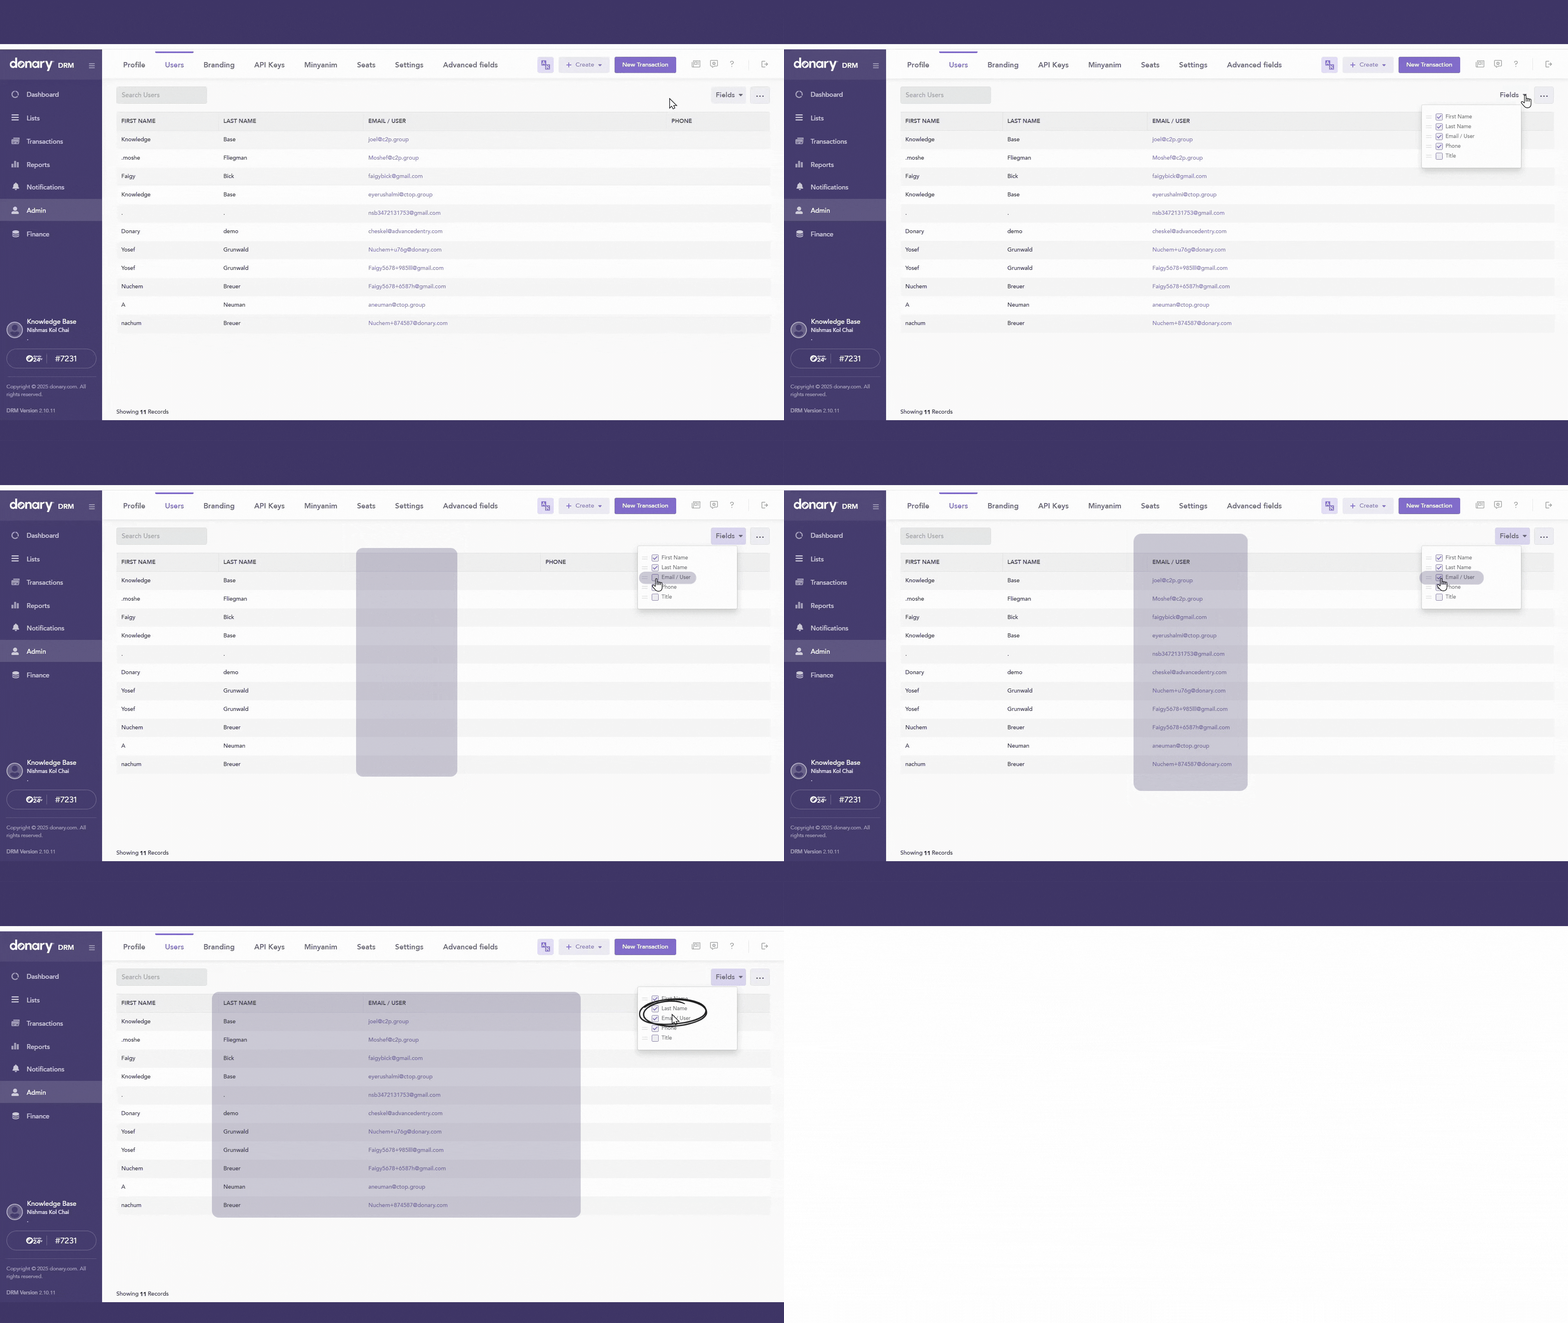
• Select the Fields button, then check or uncheck the boxes next to each column name to display or conceal  that column.&#x20;

<mark style="color:$primary;">**Change Order**</mark>&#x20;

• Drag and drop the names of the columns to rearrange the displayed column order. <br>

<figure><img src="https://donarystorage.blob.core.windows.net/email-imgs/User%20view%20adjustment.gif" alt=""><figcaption><p>Show/hide columns or change column order - Click on image to enlarge</p></figcaption></figure>

***

### Export users&#x20;

• Click on the 3 dots in the top righthand corner to export lists of users. ![](data:image/png;base64,iVBORw0KGgoAAAANSUhEUgAAACoAAAAhCAYAAACvBDmYAAAB/UlEQVR4AeyXTW7TQBiGnxk7P8aNbAIbfiKBKGxAgJASqd0jDoEQuxKoVLGAgyBxAE6AegZQV4gTIMSODQWaFBHHtWcYu6wwVSeu0yqVR34tZfL9PHkde8YyjmO9CJIsyKhBq75Qi+2oubnY+Tli+9v3+Wj7B6PRmDRNrY0vOJol745/gXJpNZaMOpWr6fioRDIe7xpYZQVbAI2iCEEDx2mYAsKo+kMIges0SRNNkiRWDQqgWmukKExbFZs1SJD10diMLNIm7sRjatCqL0HtaO1o1Q5UXe90/0dVEjOZRKR/n9UqTcznCYnan9AqZRr9Zi9R7M8c3d8SjqZ82HzF2tMnvPs8ygk+vX/DcO0xmx+/oszMzpctXjx7yOu3W0zt9x0m8+CjBKjk4vXb9PsrXOp6eeXzvZsM+qssXwjNPgHa3R6DwSq3lnu4JTrkRf85lSgj6N15wMb6kBvdZl7u3LUV1jeec/eyn4N6Z6/yaPiS+/eu4Fa0rykBmrMd+6kGrdpyW0er7jtzvRp0ZssOSSg4KqWD0tl7jD4k9ahfa7NqKYTla08BtN1uIaQyy98Urc0SOAcps8TGexHNloPrOla/uAAqpSQIA1qecVZEqDkIJ+bMUpNOp0PWD4tRAM1ysmTf9wnDcC4KggDP8xBCZO2s9F9Qq8xjDloY0D8AAAD//3lEd7wAAAAGSURBVAMA5SLMNCrxJB0AAAAASUVORK5CYII=)

• Exported users will be downloaded as an excel spreadsheet to your downloads folder.&#x20;


# Branding

## Overview

<mark style="color:$primary;">**You can access the Branding tab via the Admin category in the left sidebar.**</mark>

This is the area where you can upload and modify all your branding components. The various sections of the platform retrieve the branding components accordingly.&#x20;

***

## Branding Features

### Branding types

The titles clearly indicate where to upload each branding component. Let’s explore the different areas and understand their specific functions.&#x20;

#### <mark style="color:$primary;">**Organization Logo**</mark>

The logo uploaded here will show on the receipt printed in the Mobile HQ device.&#x20;

<details>

<summary>Hover over the <img src="data:image/png;base64,iVBORw0KGgoAAAANSUhEUgAAABAAAAAZCAYAAAA4/K6pAAAB4klEQVR4AeyR228SURDGf3tKKV3lElNgg9gLEZJKSvqADTE+aP/w+mZIbWJD00IkAWxRF0oUqGyBwOLZpexiL/rQB33oZM7km5lvvj07R0zuaYJ72oMA/I87MAe0L9rU6y2aFz0M88/vPPcLBvWjMu/3yhTydSpFnVK+ysFekYOjFt07dK4EDCr7VSr6gNFEMj1e1JAPdVmByRhD1yns67eK2ALN41PqHWtSwfc0Ru5tiuzL52Rfp9lOq3ikptlpcXLcluh3F5gNvuqjaVVZJBAL0j+rkH9X4vDMkPkakcC0PdS/U7u2E0HD4OesOBnS/FDksGQwHFs3mg460byk23AyGwj6Y2bzdsUKiyqJN5tsP/PS/FRBdzY4YdS3CO4R+BYQbm4j4Vd5fNmj9rFM6fNg7gMKHp9NcYIgKsnXFMxOl9NvLVo/xg7RBmKZQNRGThCIKDHN2rNTwxOOkEmtsRpecIsSebUnrAsJ5txOI+lV4kHFKY/OmxROqtTO3RuI4Aov0iGHMwO2AMil7WyQ0JbwKLI1HtL+0rP2C8oCqqaR2dEIcNOuBKyGSnwryavdJJlcnEQySiq3QXZ3k+zWyq3D1tScgJXKI5YI+UPE18No/keoNxmS5Ppf2i7xLvTvBX4BAAD//+i0oqQAAAAGSURBVAMAz1bU8zGdZIEAAAAASUVORK5CYII=" alt=""> icon to see what it would look like.</summary>

<figure><img src="/files/iUqttUncYRnELyNp5zze" alt=""><figcaption></figcaption></figure>

</details>

{% hint style="warning" %}
**NOTE**: If a logo is NOT uploaded, the designated area will remain **blank**.
{% endhint %}

***

#### <mark style="color:$primary;">**Donate Banner**</mark>

This will show on your donation page (Webgive page). Each organization has its own unique account no. which is linked to its own donation page.&#x20;

You can access your donation page (Webgive page) by clicking on the donate button <img src="data:image/png;base64,iVBORw0KGgoAAAANSUhEUgAAAEAAAAAoCAYAAABOzvzpAAADoklEQVR4AezXvVITURQH8Du8AhTIA2iLH400WlKAtWUaY8uMFtrRaSEztKZKaS0pKK2wUYZWHgC3gGfQ/a0c5s5OYJNNCidZZ/6ez3vvOf97bhJWnj189WeZsZKW/F9HwJIPQOomoJuAJWegewJLPgDdh2D3BLonsOQMzO0JrG+spt7r3XQ4eJO+nQ4qfBl9qOztF1uNNFvXmJQlOCszW6tzIUAxmiU3nzy4KQYp7Hf7vRTxm+C1ghzx9Y21ymMPYJCB3Lbn9u5WspYuhy5nWsxMgJtTwLiDh5+PUnFxVYWQIQ8qx/V/2ztP03BwlMQ1sfn4fip+XyWkaPL46CTxiZ/9PE98dDj+elLl2co+ZBPq8ZkI0IwbqG/K3usfJMUrNEjgt0ajdDE3D2w4Hn1P6/dWqRWsFe/1d5Mmi4vLVJSkgvVFaUssSh85LVoT4HDNjDtQ80VZmLE/+/Er7fU/JdMQuZqhF2XRH/eH1Q2TcqN5tsmQR8LZ6Xk5LaOSgMtSmpq1JM/EiMudFq0JiCbqB+71D6oCNW9E/9lX1TQECciLydE0v1yE0MG+fCHF2PLH6Xxyp0VrAqKBOFABmmVH826HDeKeBMnu9XeICibJN4d1d32mSBaX5zPCunhOYm3QmoD8ME1Fswp0g2Hned6y28998jViD7eLWDaZ59Hl8ud7eDK5jw7yJ0FrAvIiolkF0hFQP1xR4uP8fC933lfv2Xq2DzwyEKQgKXykbwW5JsI0OIMtNglaExCFhHSw4r3T+sHjmnfjSLQmnk59XdjWI8BZw8Eo3JX0rOwhh0MOmz4J2hNQfic7wMGa18SkzVvnEx0J1iiaDyFuku7rkOSzv1xn8N0FeXfF67HWBGA+38yPldymx0jScyhS47lPo9G8JxSkhG/crarBjyP7iFsTxPFNgtYEaEKhcYgRhbA1H8WHL6RiQyc175PdNNkT+O3B5yx7yTENYvyHg7dJ02yEygubbxK0JsDmCgU6IEChIfnq0HxepEY0Jk8s3y8aKsofVYF8ba5b3wYzEeBABQMd3BoC6DmK8lefN+ymwu/m40bFfXqzAxq0Jkd8CIohLPZqK2cmwMEI8DVGKkwz/CSbX5zOH/C7gA+K8pbD3ySr/PIPpqa8SeJzIcBBRXnDGnVbmn3+qJ9INr+cOjQifhvq+exYc9uecqbB3AiY5tD/KXfhCWgiuyOgiaFFj3cTsOg33NRfNwFNDC16vJuARb/hpv7+AgAA//9wGibfAAAABklEQVQDALTUpm+LokjpAAAAAElFTkSuQmCC" alt="" data-size="line"> on the bottom lefthand side of your DRM.&#x20;

<details>

<summary>Hover over the <img src="data:image/png;base64,iVBORw0KGgoAAAANSUhEUgAAABAAAAAZCAYAAAA4/K6pAAAB4klEQVR4AeyR228SURDGf3tKKV3lElNgg9gLEZJKSvqADTE+aP/w+mZIbWJD00IkAWxRF0oUqGyBwOLZpexiL/rQB33oZM7km5lvvj07R0zuaYJ72oMA/I87MAe0L9rU6y2aFz0M88/vPPcLBvWjMu/3yhTydSpFnVK+ysFekYOjFt07dK4EDCr7VSr6gNFEMj1e1JAPdVmByRhD1yns67eK2ALN41PqHWtSwfc0Ru5tiuzL52Rfp9lOq3ikptlpcXLcluh3F5gNvuqjaVVZJBAL0j+rkH9X4vDMkPkakcC0PdS/U7u2E0HD4OesOBnS/FDksGQwHFs3mg460byk23AyGwj6Y2bzdsUKiyqJN5tsP/PS/FRBdzY4YdS3CO4R+BYQbm4j4Vd5fNmj9rFM6fNg7gMKHp9NcYIgKsnXFMxOl9NvLVo/xg7RBmKZQNRGThCIKDHN2rNTwxOOkEmtsRpecIsSebUnrAsJ5txOI+lV4kHFKY/OmxROqtTO3RuI4Aov0iGHMwO2AMil7WyQ0JbwKLI1HtL+0rP2C8oCqqaR2dEIcNOuBKyGSnwryavdJJlcnEQySiq3QXZ3k+zWyq3D1tScgJXKI5YI+UPE18No/keoNxmS5Ppf2i7xLvTvBX4BAAD//+i0oqQAAAAGSURBVAMAz1bU8zGdZIEAAAAASUVORK5CYII=" alt=""> icon to see what it would look like.</summary>

<figure><img src="/files/Y6Yn69PL4j8sn5oxU6Wu" alt=""><figcaption></figcaption></figure>

</details>

***

#### <mark style="color:$primary;">**Org Letterheads**</mark>

The organization's letterhead will appear on all receipts and statements for donor’s payments or pledges.

<details>

<summary>Hover over the <img src="data:image/png;base64,iVBORw0KGgoAAAANSUhEUgAAABAAAAAZCAYAAAA4/K6pAAAB4klEQVR4AeyR228SURDGf3tKKV3lElNgg9gLEZJKSvqADTE+aP/w+mZIbWJD00IkAWxRF0oUqGyBwOLZpexiL/rQB33oZM7km5lvvj07R0zuaYJ72oMA/I87MAe0L9rU6y2aFz0M88/vPPcLBvWjMu/3yhTydSpFnVK+ysFekYOjFt07dK4EDCr7VSr6gNFEMj1e1JAPdVmByRhD1yns67eK2ALN41PqHWtSwfc0Ru5tiuzL52Rfp9lOq3ikptlpcXLcluh3F5gNvuqjaVVZJBAL0j+rkH9X4vDMkPkakcC0PdS/U7u2E0HD4OesOBnS/FDksGQwHFs3mg460byk23AyGwj6Y2bzdsUKiyqJN5tsP/PS/FRBdzY4YdS3CO4R+BYQbm4j4Vd5fNmj9rFM6fNg7gMKHp9NcYIgKsnXFMxOl9NvLVo/xg7RBmKZQNRGThCIKDHN2rNTwxOOkEmtsRpecIsSebUnrAsJ5txOI+lV4kHFKY/OmxROqtTO3RuI4Aov0iGHMwO2AMil7WyQ0JbwKLI1HtL+0rP2C8oCqqaR2dEIcNOuBKyGSnwryavdJJlcnEQySiq3QXZ3k+zWyq3D1tScgJXKI5YI+UPE18No/keoNxmS5Ppf2i7xLvTvBX4BAAD//+i0oqQAAAAGSURBVAMAz1bU8zGdZIEAAAAASUVORK5CYII=" alt=""> icon to see what it would look like.</summary>

<figure><img src="/files/Ky24ebxSOIQWNnIN9tAn" alt=""><figcaption></figcaption></figure>

</details>

{% hint style="warning" %}
**NOTE**: If a letterhead has NOT been uploaded, the organization's logo will be used on the receipts instead. Should neither a letterhead nor a logo be uploaded, the receipt will only display the organization's details (taken from the [Admin Profile](/cloud-drm/getting-started/setup-and-configuration/admin#profile)), leaving the logo area **blank**.
{% endhint %}

***

#### <mark style="color:$primary;">**Shul Kiosk Main Page**</mark>

What you upload here will show in the top section of the Shul Kiosk main screen.&#x20;

<details>

<summary>Hover over the <img src="data:image/png;base64,iVBORw0KGgoAAAANSUhEUgAAABAAAAAZCAYAAAA4/K6pAAAB4klEQVR4AeyR228SURDGf3tKKV3lElNgg9gLEZJKSvqADTE+aP/w+mZIbWJD00IkAWxRF0oUqGyBwOLZpexiL/rQB33oZM7km5lvvj07R0zuaYJ72oMA/I87MAe0L9rU6y2aFz0M88/vPPcLBvWjMu/3yhTydSpFnVK+ysFekYOjFt07dK4EDCr7VSr6gNFEMj1e1JAPdVmByRhD1yns67eK2ALN41PqHWtSwfc0Ru5tiuzL52Rfp9lOq3ikptlpcXLcluh3F5gNvuqjaVVZJBAL0j+rkH9X4vDMkPkakcC0PdS/U7u2E0HD4OesOBnS/FDksGQwHFs3mg460byk23AyGwj6Y2bzdsUKiyqJN5tsP/PS/FRBdzY4YdS3CO4R+BYQbm4j4Vd5fNmj9rFM6fNg7gMKHp9NcYIgKsnXFMxOl9NvLVo/xg7RBmKZQNRGThCIKDHN2rNTwxOOkEmtsRpecIsSebUnrAsJ5txOI+lV4kHFKY/OmxROqtTO3RuI4Aov0iGHMwO2AMil7WyQ0JbwKLI1HtL+0rP2C8oCqqaR2dEIcNOuBKyGSnwryavdJJlcnEQySiq3QXZ3k+zWyq3D1tScgJXKI5YI+UPE18No/keoNxmS5Ppf2i7xLvTvBX4BAAD//+i0oqQAAAAGSURBVAMAz1bU8zGdZIEAAAAASUVORK5CYII=" alt=""> icon to see what it would look like.</summary>

<figure><img src="/files/i7FMiXu6jjHc8PKIYkpw" alt=""><figcaption></figcaption></figure>

</details>

***

### Upload Branding Element

<mark style="color:$info;">**Follow these steps to upload your branding elements (the process is the same for all elements):**</mark>

* **Select or Drag and Drop**: Click "Select file" and choose the element from your files, or drag and drop the file directly.
* **Format**: Compatible formats are **JPG** and **PNG**.
* **Pixel size:** The required pixel size for each element is displayed directly beneath its upload area.
* **Adjust Size:** Use the **Zoom in** and **Zoom out** buttons to adjust the element's size within the dotted line frame.
* **Replace Element:** To change an element, simply click the **red trash can** in the bottom right corner and then select the new item.
* **Save**: Once all branding elements have been uploaded, remember to **save your work**.

{% hint style="warning" %}
&#x20;**Important**: For the Mobile HQ device to produce high-quality logo printing on the receipt, the logo must contain no more than 50% color coverage.
{% endhint %}

<figure><img src="/files/zFnq0Vonwst20x9u0wRo" alt=""><figcaption><p>How to upload branding elements - Click on image to enlarge</p></figcaption></figure>

***

### Recording

<div align="left"><figure><img src="/files/GgPq30O5ZWYswiGyXaTH" alt=""><figcaption></figcaption></figure></div>

Donary provides a dedicated donation phone line at **845-DONARY3**.

Each organization is assigned a unique extension, which corresponds to its account number.

When a donor dials the organization's extension, they will hear the organization's recording which is uploaded here.

<mark style="color:$info;">**Here are the steps to upload a recording:**</mark>

* Click "**select file**" and choose your recording.
* Ensure the file is in the supported **WAV format**.
* **Listen** to the uploaded file to confirm it is the correct recording.
* To change the recording, simply click the small **red trash icon** on the right, and then select a different file.

<br>


# API Keys

## Overview

<mark style="color:$primary;">**You can access the API Keys tab via the Admin category in the left sidebar.**</mark>

The DRM system does not process payments directly. Instead, it facilitates integration with a selected third-party payment processor using an API key generated within that processor's system. The DRM sends the donation details (payment details) along with the designated API key to the processing account. The processor then handles the payment, withdrawing the funds from the donor's account and depositing them into the organization's account.

***

## Default Key Features

### <mark style="color:$primary;">**Add API Keys**</mark>

To add a new API key as a default gateway to the system, follow these steps:

* Click the “**+New**” button, located on the top right.
* In the “**Gateway nickname**” field, enter a name for the gateway.
* From the “**Credit card gateway**” dropdown, select the name of the processing company.
* Choose the transaction type from the “**API type**” dropdown.
* Paste the API key you copied from the processing company into the **“Processing Integration Key”** field.

  *<mark style="color:$warning;">**Important:**</mark> <mark style="color:$warning;"></mark><mark style="color:$warning;">Make sure the API key is entered correctly - any inaccuracies may cause the transaction to fail.</mark>*
* Select the desired currency and country using the respective dropdown fields.
* **Save your changes** to finalize the addition of the default API key.&#x20;
* Run a **TEST charge** after creating your API key to ensure it was set up correctly.
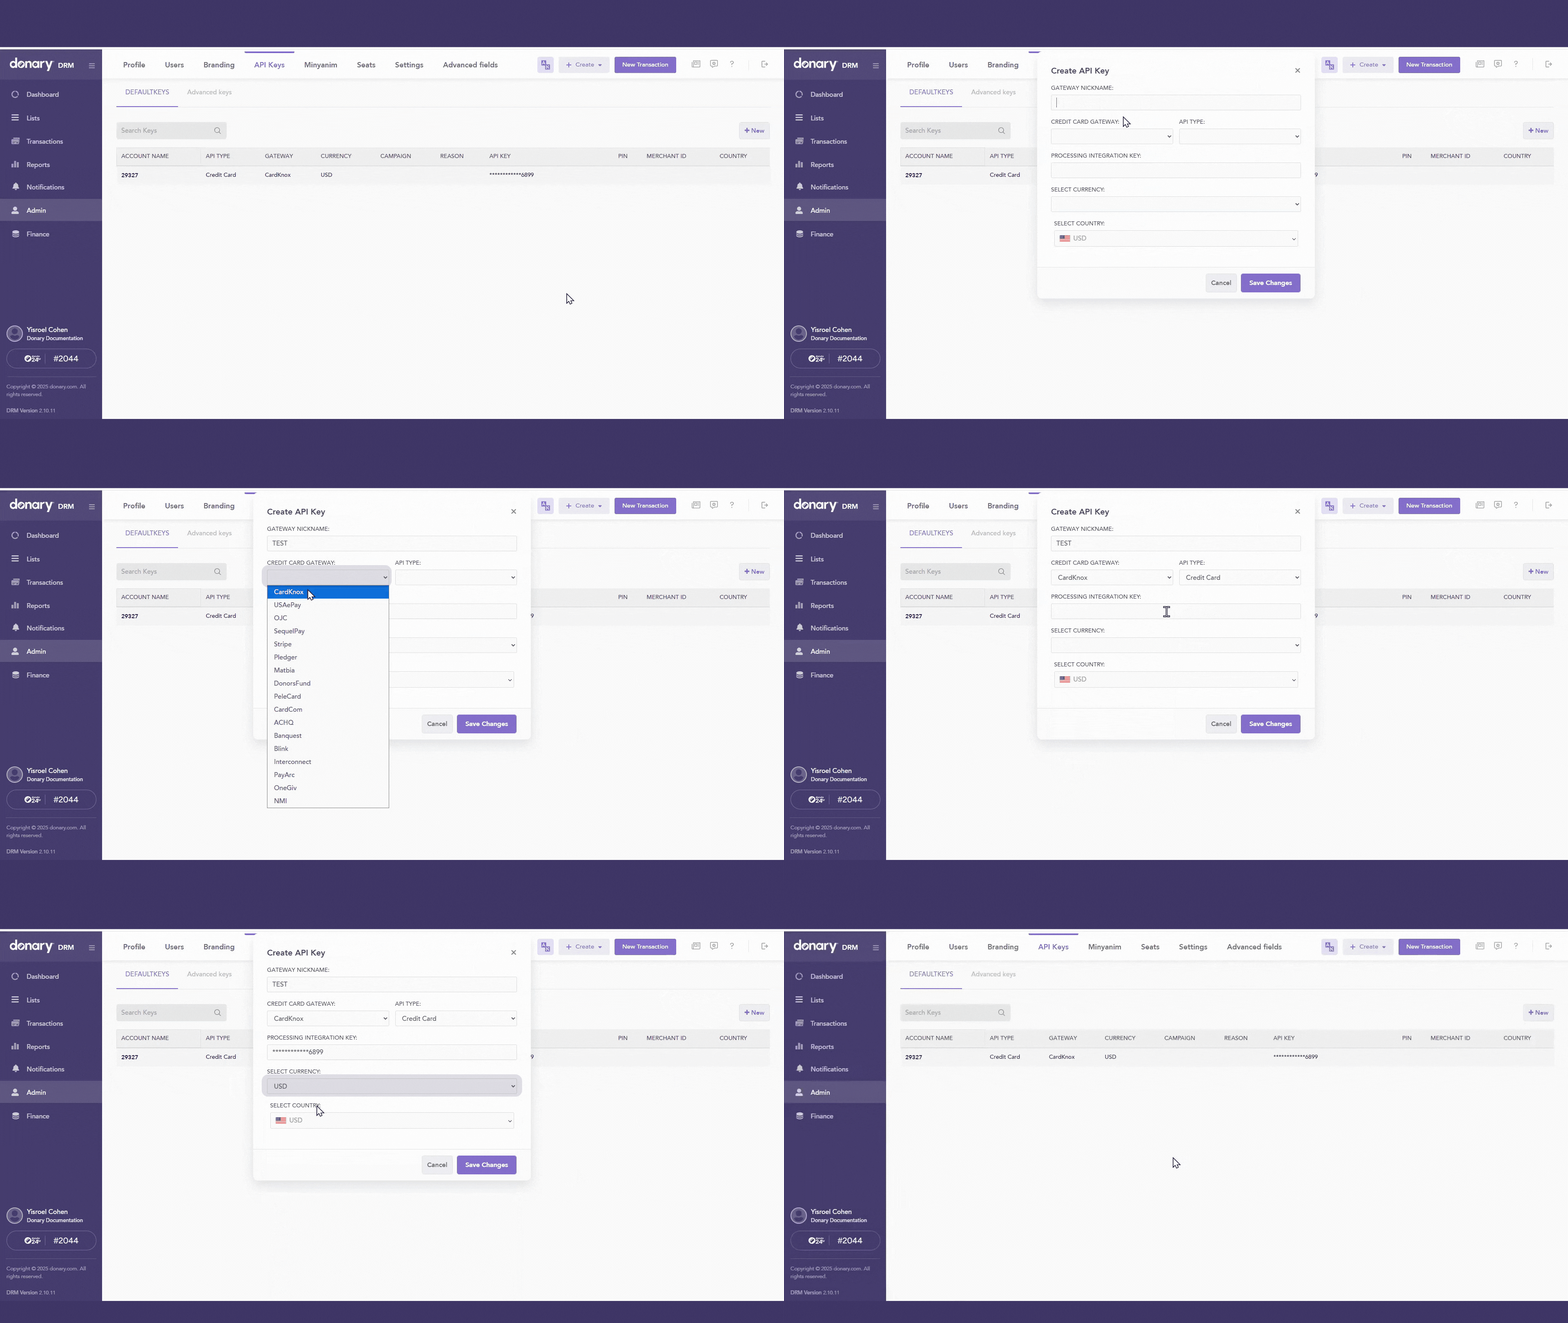
<figure><img src="https://donarystorage.blob.core.windows.net/email-imgs/Add%20API%20Key.gif" alt=""><figcaption><p>Add API key - Click on image to enlarge</p></figcaption></figure>

{% hint style="info" %}
For more information on the available options and instructions for setting up each gateway, see [Setting up API Keys.](/cloud-drm/getting-started/setup-and-configuration/api-keys/setting-up-api-keys)
{% endhint %}

***

### <mark style="color:$primary;">**Remove API Keys**</mark>

API keys can be **deleted** immediately using two methods:

* Click the delete icon on the far right of the specific API key you wish to remove.
* Click the edit icon on the far right of the desired API key, and then select "remove" in the bottom left corner of the subsequent window.

<figure><img src="/files/1G9TY7a9osBBJ7QDttRr" alt=""><figcaption><p>Remove API key - Click on image to enlarge</p></figcaption></figure>

***

### <mark style="color:$primary;">**Edit API Keys**</mark>

To modify an existing API key:

* Click the **Edit** icon on the far right of the desired API key.
* Adjust the fields you wish to change.
* Click "**Save Changes**"
* Run a **TEST charge** after editing your API key to ensure it was set up correctly.

<figure><img src="/files/d0q7iFAokekFZpBQDtTX" alt=""><figcaption><p>Edit API key - Click on image to enlarge</p></figcaption></figure>

***

## Advanced Key Features

The DRM platform allows you to add an API key for use with a **specific** [**campaign**](#user-content-fn-1)[^1].

Your organization can assign a dedicated API key to each campaign. This ensures that all funds for that campaign are processed through a **designated processing account**.

All functionality is the same as with the default API keys. You can add, edit, and delete advanced keys by following the same instructions outlined in the [Default Key section](#default-key-features). The only difference is that with advanced keys, you are assigning a specific campaign to each API key.

<figure><img src="/files/hupKjV7fKNjGWaOQGTnK" alt=""><figcaption></figcaption></figure>

For example, you might create a campaign named **“Shabbos Meron”.**\
Donations made under this campaign would be associated with that specific cause and processed using its designated API key.

[^1]: The cause and purpose of the donation. Every donation is directed towards a specific cause AKA campaign.


# Setting up API Keys

## API Fields

This article provides additional details on the various fields that must be completed when creating a new API key.

### <i class="fa-hand-point-right" style="color:$primary;">:hand-point-right:</i> Gateway Nickname

The purpose of choosing a gateway nickname: For some gateways, this can be any value used for the user’s reference. For others, it is a required part of the API key setup and must contain the gateway account number.

***

### <i class="fa-hand-point-right" style="color:$primary;">:hand-point-right:</i> Credit card Gateway

This field specifies the **processing company** responsible for handling the funds.&#x20;

***

### <i class="fa-hand-point-right" style="color:$primary;">:hand-point-right:</i> API Type

This field specifies whether you are going to process by **credit cards** or **charity cards.**&#x20;

Refer to the [API Type by Gateway](#api-type-by-gateway) table below for compatibility details.

#### <mark style="color:$primary;">**Credit Cards**</mark>

Includes all standard credit cards such as **Visa, MasterCard, American Express** etc.

#### <mark style="color:$primary;">**Charity Cards**</mark>

Charity cards are often referred to as "**DAF Cards**" (Donor advised fund cards).

Companies that issue these cards enable donors to contribute to charities while receiving tax deductions.&#x20;

Examples of providers offering charity cards include **Matbia, OJC, Donors Fund, Pledger, and OneGiv**.

Before you can connect your Donary account to your charity card accounts, you must set up accounts with each charity card.

***

### <i class="fa-hand-point-right" style="color:$primary;">:hand-point-right:</i> Processing Integration Key

This is a unique API key that connects your platform to a payment processor, allowing secure processing of payments or donations.

You will receive this key from your processing company. Copy and paste it into this field.

***

### <i class="fa-hand-point-right" style="color:$primary;">:hand-point-right:</i> Currency

Choose the correct currency to be used for these transactions.

***

### <i class="fa-hand-point-right" style="color:$primary;">:hand-point-right:</i> Country

Choose the country where the API will be used. This usually corresponds to the country selected in the **Currency** field.

***

## API Type by Gateway

Each credit card gateway supports a specific set of API types. Some gateways are compatible only with credit cards, others only with charity cards, and some support both or a partial combination.&#x20;

The table below clearly outlines the available API types for each credit card gateway:

| Gateway      | Credit Card                     | Charity Card                                                                                                   |
| ------------ | ------------------------------- | -------------------------------------------------------------------------------------------------------------- |
| CardKnox     | <i class="fa-check">:check:</i> | <i class="fa-check">:check:</i> *<mark style="color:$primary;">OJC\*\*, Pledger, DonorsFund cards only</mark>* |
| USAePay      | <i class="fa-check">:check:</i> | <i class="fa-x">:x:</i>                                                                                        |
| OJC          | <i class="fa-x">:x:</i>         | <i class="fa-check">:check:</i> *<mark style="color:$primary;">OJC card</mark>*                                |
| SequelPay    | <i class="fa-check">:check:</i> | <i class="fa-x">:x:</i>                                                                                        |
| Stripe       | <i class="fa-check">:check:</i> | <i class="fa-x">:x:</i>                                                                                        |
| Pledger      | <i class="fa-x">:x:</i>         | <i class="fa-check">:check:</i> *<mark style="color:$primary;">Pledger card\*</mark>*                          |
| Matbia       | <i class="fa-x">:x:</i>         | <i class="fa-check">:check:</i> *<mark style="color:$primary;">Matbia card\*</mark>*                           |
| DonorsFund   | <i class="fa-x">:x:</i>         | <i class="fa-check">:check:</i> *<mark style="color:$primary;">DonorsFund Card</mark>*                         |
| PeleCard     | <i class="fa-check">:check:</i> | <i class="fa-x">:x:</i>                                                                                        |
| CardCom      | <i class="fa-check">:check:</i> | <i class="fa-x">:x:</i>                                                                                        |
| ACHQ         | See more info *here*.           |                                                                                                                |
| Banquest     | <i class="fa-check">:check:</i> | <i class="fa-x">:x:</i>                                                                                        |
| Blink        | <i class="fa-check">:check:</i> | <i class="fa-x">:x:</i>                                                                                        |
| Interconnect | <i class="fa-check">:check:</i> | <i class="fa-x">:x:</i>                                                                                        |
| PayArc       | <i class="fa-check">:check:</i> | <i class="fa-x">:x:</i>                                                                                        |
| OneGiv       | <i class="fa-x">:x:</i>         | <i class="fa-check">:check:</i> *<mark style="color:$primary;">OneGiv card</mark>*                             |
| NMI          | <i class="fa-check">:check:</i> | <i class="fa-x">:x:</i>                                                                                        |

\****Pledger and Matbia API keys:*** If an API key is not set up for these charity cards, Donary can still send the payment information to the corresponding service (Pledger or Matbia) using the Tax ID to associate the payment with the correct account.

However, Donary strongly recommends using an API key whenever possible, as a Tax ID may be linked to multiple accounts, which can lead to complications.

***\*\*CardKnox - OJC API Keys:***  When processing charges through OJC and only a CardKnox-Credit Card API key is configured, the system automatically transmits the required OJC information to CardKnox — even without a dedicated CardKnox-OJC API key.

{% hint style="danger" %}
**IMPORTANT!** Ensure your CardKnox account is enabled for [DAF card ](#charity-cards)processing.
{% endhint %}

***

## Credit Card Gateway Requirements&#x20;

The table below clearly outlines the requirements and terminology for each gateway company:

<table><thead><tr><th width="208">Credit Card Gateway</th><th width="146">Nickname</th><th width="223">API Key</th><th width="245">PIN</th></tr></thead><tbody><tr><td>CardKnox</td><td></td><td><i class="fa-check">:check:</i></td><td><i class="fa-x">:x:</i></td></tr><tr><td>USAePay</td><td></td><td><i class="fa-check">:check:</i></td><td><i class="fa-check">:check:</i></td></tr><tr><td>OJC</td><td></td><td><i class="fa-check">:check:</i> **</td><td></td></tr><tr><td>SequelPay</td><td></td><td><i class="fa-check">:check:</i> </td><td><i class="fa-check">:check:</i> </td></tr><tr><td>Stripe</td><td></td><td><i class="fa-check">:check:</i></td><td><i class="fa-check">:check:</i></td></tr><tr><td>Pledger</td><td></td><td><i class="fa-check">:check:</i> **</td><td></td></tr><tr><td>Matbia</td><td></td><td><i class="fa-check">:check:</i></td><td></td></tr><tr><td>DonorsFund</td><td></td><td><i class="fa-check">:check:</i> *</td><td><i class="fa-check">:check:</i> * <em><mark style="color:$primary;">(Account no.)</mark></em></td></tr><tr><td>PeleCard (IL Gateway)</td><td><i class="fa-check">:check:</i></td><td><i class="fa-check">:check:</i></td><td><i class="fa-check">:check:</i></td></tr><tr><td>CardCom (IL Gateway)</td><td><i class="fa-check">:check:</i></td><td><i class="fa-check">:check:</i></td><td><i class="fa-check">:check:</i></td></tr><tr><td>ACHQ</td><td>See more info <em>here</em>.</td><td></td><td></td></tr><tr><td>Banquest</td><td></td><td><i class="fa-check">:check:</i></td><td><i class="fa-check">:check:</i></td></tr><tr><td>Blink (UK Gateway)</td><td></td><td><i class="fa-check">:check:</i> <em><mark style="color:$primary;">(Signature Key)</mark></em></td><td><i class="fa-check">:check:</i> <em><mark style="color:$primary;">(Gateway ID)</mark></em></td></tr><tr><td>Interconnect</td><td></td><td><i class="fa-check">:check:</i></td><td></td></tr><tr><td>PayArc</td><td></td><td><i class="fa-check">:check:</i></td><td></td></tr><tr><td>OneGiv</td><td></td><td><i class="fa-check">:check:</i></td><td></td></tr><tr><td>NMI</td><td></td><td><i class="fa-check">:check:</i></td><td></td></tr></tbody></table>

\****DonorsFund PIN:*** There is one default API key used for all DonorsFunds accounts. Please contact us with your PIN number so we can add or edit the API key.

\*\****OJC & Pledger API Key:*** Donary can obtain the API key directly from these providers on your behalf— no back-and-forth required. There’s no need for you to request the key yourself or forward it to Donary. We handle the entire process for you.


# ACHQ Processing

Donary is integrated with **ACHQ**.

**ACHQ** is a payment processing company that uses a donor’s bank information to process transactions.&#x20;

To use this gateway, users must first set up an account with **ACHQ**.

### <mark style="color:$primary;">**To set up an ACHQ account:**</mark>

You can access the setup form using this [link](https://achq.com/donary/), or by following the steps outlined below:

* From the [Quick Actions](/cloud-drm/getting-started/user-interface#section-c-quick-actions) section, on the top right hand corner, click **New Transaction.**
* A **New Transaction** card will open.
* Click the **Payment Type** tab at the top of the card.
* Choose **ACH** as the payment type.
* Click **Apply for ACH**.
* A new window will open displaying the **application form**.

Fill out the form with the required information.

<figure><img src="/files/qCwyNxnygN6dHWy2m4cl" alt=""><figcaption></figcaption></figure>

Once a user sets up an ACHQ account and it is approved, we will receive an email containing all the relevant information. Donary will then set up an **API key** for the ACHQ gateway.

After this is set up, users can use the gateway by selecting the **ACH** option in **New Transaction** and completing the required fields to process the payment.

***

### <mark style="color:$primary;">**ACHQ Rate fees:**</mark>

| Description                    | Rates |
| ------------------------------ | ----- |
| Monthly fee for Unlimited user | $19   |
| Processing fee                 | 0.1%  |
| Transaction fee                | $0    |
| Return item fee                | $25   |
| Chargeback fee                 | $12   |
| Bank account verification fee  | $0.45 |

{% hint style="warning" %}
**Note:** The fees listed above are charged by **ACHQ**. Donary does not charge or control these fees and is not responsible for them.
{% endhint %}


# Settings

## Overview

<mark style="color:$primary;">**You can access the Settings tab via the Admin category in the left sidebar.**</mark>

In this section, you can adjust and customize various general settings for your Donary devices, online donation page and DRM platform.

***

## Setting Features

### **Preset Amount**

A **preset amount** is an optional donation value that you define here. These preset amounts will appear across all your Donary devices, online donation page and DRM platform.

Using preset donation amounts makes the giving process easier, faster, and hassle-free.

Each Donary device and platform can display up to six preset donation amounts, with each line representing a different amount and unique title. *In example: Zechus of a child $180.*

<mark style="color:$primary;">**How to customize your preset amounts:**</mark>

* Enter the desired amount in the **Dollar** field.
* Provide a **Title**/**Description** for the amount. (optional)
* **Save** your changes.

<figure><img src="/files/zhK0OKN5J80Momi0QB3s" alt=""><figcaption><p>Add Preset Amounts - Click on image to enlarge</p></figcaption></figure>

{% hint style="success" %}
**Note**: You can set unique preset amounts for each campaign. When configured, the campaign-specific preset amounts will override the general preset amounts defined here whenever that campaign is selected.

This can be done in the **Lists** category, under the **Campaign** tab, within each campaign’s card: &#x20;
{% endhint %}

<figure><img src="/files/jwgGw3XZQCuMehCdW8vl" alt="" width="563"><figcaption></figcaption></figure>

***

### **Send Automatic Email**

In this section, you can set when automatic emails are sent to donors by default.

<mark style="color:$info;">**Use the toggles to enable or disable automatic emails for each scenario.**</mark>

#### <mark style="color:$primary;">**Pledge Bills**</mark>

This applies when a **pledge** is made. When enabled <img src="/files/yplcBcoACLZDXSsXIWz2" alt="" data-size="line">,  an email with the pledge transaction details will be sent automatically.

#### <mark style="color:$primary;">**Payment Receipt**</mark>

This applies when a **payment** is made. When enabled <img src="/files/dTwBfIhq2Yin3SbnBbeQ" alt="" data-size="line">,  an email with the payment transaction details will be sent automatically.

<figure><img src="/files/BLZf44IxoMfxnKQNTxvR" alt=""><figcaption><p>Send an automatic email - Click on image to enlarge</p></figcaption></figure>

***

### **Customize SMS messages**

In this section, you can customize the SMS/text messages sent in the different scenarios outlined below:

#### <mark style="color:$primary;">**Receipts Message**</mark>

Here you can customize the SMS/text sent to donors with every **receipt** issued from your Donary devices and DRM platform. The default message is:

> Hi {Donor}, thank you for your donation of {Amount} towards {Organization} {Campaign} campaign. Your support means a lot to us! Your receipt: {Document URL}

You can modify this message as needed, using the “**Insert Field Value**” dropdown to select different variable options.

***

#### <mark style="color:$primary;">**SMS Pledge Bill Message**</mark>

Here you can customize the SMS/text sent to donors with every **pledge** message from your Donary devices and DRM platform. The default message is:

> Hi {Donor}, you pledged {Amount} to {Organization} {Campaign} campaign! Complete your donation now: {Document URL}

You can adjust this message as desired, using the “**Insert Field Value**” dropdown to choose different variable options.

***

#### <mark style="color:$primary;">**SMS Statements Message**</mark>

Here you can customize the SMS/text sent to donors with every **statement** from your Donary devices and DRM platform. The default message is:

> Hi {Donor}, you pledged {Amount} to {Organization} {Campaign} campaign! Complete your donation now: {Document URL}

You can update this message as needed, using the “**Insert Field Value**” dropdown to select different variable options.


# Advanced Fields

## Overview

<mark style="color:$primary;">**You can access the Advanced Fields tab via the Admin category in the left sidebar.**</mark>

Each donor has an individual card where all relevant information is displayed. The DRM platform provides an initial, basic layout that includes core details such as name, address, phone number, and email.

Your organization may need to store *additional* donor information beyond these basics - this is where **advanced fields** come in. This section allows you to add extra details to each donor card, tailored to your organization’s specific needs.

***

## Custom Fields Features

Here you can create **custom fields** that appear on each donor's profile - to store additional information important to your organization.

You can choose between a **free-text** field, where information can be entered manually, or a **dropdown** field with predefined options to select from.

Later, you can filter and sort donors based on these custom fields, making it easy to track, manage, and analyze specific segments or groups.

### <mark style="color:$primary;">**Add custom field**</mark>

* Click on **Add new field**.
* Select the desired field type: **Free text** or **Dropdown**.

  <mark style="color:$info;">(In example: a "Mother's name" field would be</mark> <mark style="color:$info;"></mark><mark style="color:$info;">**f**</mark>*<mark style="color:$info;">**ree text**</mark>* <mark style="color:$info;">- allowing manual entry of a donors' mother's name. A "Member type" field would be a</mark> <mark style="color:$info;"></mark>*<mark style="color:$info;">**dropdown**</mark>* <mark style="color:$info;"></mark><mark style="color:$info;">- allowing to choose between given options, such as</mark> <mark style="color:$info;"></mark>*<mark style="color:$info;">weekly member</mark>* <mark style="color:$info;"></mark><mark style="color:$info;">or</mark> <mark style="color:$info;"></mark>*<mark style="color:$info;">Shabbos member</mark>*<mark style="color:$info;">.)</mark>
* Enter a descriptive **Field title**.&#x20;

  <mark style="color:$info;">(In example: "Member since", "Mother's Name", "Member type" etc.)</mark>
* Ensure you click **Save field** to complete the process.

<figure><img src="/files/3Axbw0YXdF3Zknncueva" alt=""><figcaption><p>Add a Custom Field - Click on image to enlarge</p></figcaption></figure>

<details>

<summary>These fields will show in the <strong>donors card</strong> here:</summary>

<figure><img src="/files/PndrFPNpTLJBu6Oot1mF" alt=""><figcaption></figcaption></figure>

</details>

***

### <mark style="color:$primary;">**Edit a custom field**</mark>

* Click the **Edit** icon on the far right of the custom field.
* Make your changes, then click **Save**.

***

### <mark style="color:$primary;">**Delete a custom field**</mark>

You can delete a custom field using either of the following methods:

* Click the **Delete** icon on the far right of the custom field.
* Click the **Edit** icon on the far right of the custom field, then select **Delete Field** in the edit window.

{% hint style="warning" %}
**IMPORTANT:** Deleting a custom field will permanently remove the field and all of its data from every donor record.
{% endhint %}

## **Tags Features**

Tags are customizable labels that you can assign to donors for **short-term use**, helping to identify or add supplementary information. They are especially useful for sorting and filtering your donor list, making it easier to manage and organize donor data efficiently.

To facilitate quick recognition and differentiation, you can assign both a name and a color to each tag. A single donor can have **multiple** tags.&#x20;

You can customize the tags available within your platform here.

### <mark style="color:$primary;">**Add a New Tag**</mark>

1. Select **Add Tag**.
2. Type in the desired tag name.

   (In example: "Send Invitation", "Give Chanuka Gift" etc.)
3. Choose a color for the specific tag.
4. **Save** the tag.

<figure><img src="/files/y1SaNqu8AZpKw0WxeC2D" alt=""><figcaption><p>To Add a Tag - Click on image to enlarge</p></figcaption></figure>

<details>

<summary>These tags will show in the <strong>donors card</strong> here:</summary>

<figure><img src="/files/by7fuKn4ih7cdYYAIjnp" alt="" width="563"><figcaption></figcaption></figure>

</details>

***

### <mark style="color:$primary;">**Edit a Tag**</mark>

* Click the **Edit** icon on the far right of the tag.
* Make your changes, then click **Save**.

***

### <mark style="color:$primary;">**Delete a Tag**</mark>

You can delete a tag using either of the following methods:

* Click the **Delete** icon on the far right of the tag.
* Click the **Edit** icon on the far right of the tag, then select **Delete Tag** in the edit window.

{% hint style="warning" %}
**IMPORTANT:** Deleting a tag will permanently remove that tag from every donor record.
{% endhint %}


# Pre-Start Checklist

**We’re almost there!** <i class="fa-hands-clapping">:hands-clapping:</i>\
After completing all the setup and configuration steps, let’s make sure everything is fully set up before you start working.

Please go through the following checklist to confirm that everything is ready.

## <mark style="color:$primary;">**Checklist:**</mark>

{% stepper %}
{% step %}

### Branding

Is your branding uploaded and ready?

Make sure all elements of your branding are properly uploaded. \[See [instructions ](/cloud-drm/getting-started/setup-and-configuration/branding)here.]
{% endstep %}

{% step %}

### Settings

Are your preset donation amounts set? How about your automatic SMS messages?

Not sure? \[Check [here ](/cloud-drm/getting-started/setup-and-configuration/settings)for more information.]
{% endstep %}

{% step %}

### Advanced Fields&#x20;

Have you added all your important custom fields and tags?&#x20;

Make sure these are set up so you can add your contacts properly.  \[See [instructions ](/cloud-drm/getting-started/setup-and-configuration/advanced-fields)here.]
{% endstep %}

{% step %}

### Donors

Let’s bring all your [donors ](#user-content-fn-1)[^1]onboard!&#x20;

[Import ](/cloud-drm/getting-started/pre-start-checklist/import-donors)existing donors in bulk. You can also add your donors one at a time through the [Quick Actions](/cloud-drm/getting-started/user-interface#section-c-quick-actions) section.
{% endstep %}

{% step %}

### Campaigns

Enter all the [campaigns ](#user-content-fn-2)[^2]you’re currently working on or plan to launch.&#x20;

[Import ](/cloud-drm/getting-started/pre-start-checklist/import-campaigns)existing campaigns in bulk. You can also add your campaigns one at a time through the [Quick Actions](/cloud-drm/getting-started/user-interface#section-c-quick-actions) section.
{% endstep %}

{% step %}

### Collectors

If you already have [collectors ](#user-content-fn-3)[^3]working, make sure to add them to the system.&#x20;

&#x20;\[See [instructions ](/cloud-drm/getting-started/pre-start-checklist/add-collectors)here.]
{% endstep %}
{% endstepper %}

<mark style="color:$primary;">**And you're good to go! Hatzlacha!!**</mark>&#x20;

[^1]: Individuals who have donated or are committed to donating money in the future.

[^2]: The cause and purpose of the donation. Every donation is directed towards a specific cause AKA campaign.

[^3]: AKA fundraisers. Individuals that actually collect the money and donations.


# Import Donors

## How to import existing donors

To get started, you can import all your current donor data into the system.

**Here's how:**

1. In the left sidebar, go to the **“Lists”** category.
2. Click on the **“Donors”** tab.
3. Click the **three-dot icon** in the upper right corner.
4. Select **“Import Donors.”**
5. Download the **“Donor Template”** Excel file.
6. Fill in the template with your existing donors’ information.
   1. Follow the heading instructions.
   2. See the example of a donor entry provided in the first line.
   3. Donor can be updated later if needed.
7. Save and close the file.
8. Drag the file into the upload area or click to **choose file**.
9. Click **“Upload.”**

Your donors have been successfully imported and will now appear in the Donors list. An email notification will be sent to the user who initiated the import once the process is complete.

{% embed url="<https://drive.google.com/file/d/187XUKth6jGvAUiaTt2A7vnkChkP-W9cu/view?usp=sharing>" %}

{% hint style="warning" %}
**IMPORTANT:**

* Make sure to fill in the template exactly according to the column titles to ensure a smooth import.
* Some columns include instructions on acceptable values or options to change labels—follow these carefully.
  {% endhint %}


# Import Campaigns

## How to import existing campaigns&#x20;

To get started, you can import all your current campaigns into the system.

**Here's how:**

1. In the left sidebar, go to the **“Lists”** category.
2. Click on the **“campaigns”** tab.
3. Click the **three-dot icon** in the upper right corner.
4. Select **“Import ”**
5. Download the **“Campaign Template”** Excel file.
6. Fill in the template with your existing campaign information.
   1. Campaign Number - Enter a unique number that does not already exist in the campaign list.
   2. Campaign Name - This name is used internally.
   3. Friendly Name - This name is used externally and is visible to the donor on receipts and invoices.
   4. Parent name - Enter the broader title for these types of campaigns. You can create nested sub-campaigns up to 5 levels deep, with each child campaign able to have its own sub-campaigns.
7. Save and close the file.
8. Drag the file into the upload area or click to **choose file**.
9. Click **“Upload.”**

Your campaigns are now imported and will appear in the campaigns list.

{% embed url="<https://drive.google.com/file/d/1Jh5yx1gkXw6IyByz3tzpv2WzUMjDBWnZ/view?usp=sharing>" %}

{% hint style="warning" %}
**IMPORTANT:**

* Make sure to fill in the template exactly according to the column titles to ensure a smooth import.
* Some columns include instructions on acceptable values—follow these carefully.
  {% endhint %}


# Add Collectors

## How to create collectors

To get started, you’ll need to add all your active collectors to the system.

**Here's how:**

1. Click the **"Create"** button in the [Quick Actions](/cloud-drm/getting-started/user-interface#section-c-quick-actions) section.
2. Choose **"Collectors"** from the dropdown menu.
3. **Fill in** all relevant fields.
4. Click **Save.**

Your collector is now added and will appear in the collectors list.

<figure><img src="/files/LIXkDRTlERnutB4YKS8C" alt=""><figcaption></figcaption></figure>

{% hint style="info" %}
When using any Donary device, the user can sign in with their phone number, and a collector will be created automatically. For the DRM, however, the collector must be created in advance.
{% endhint %}


# Overview

<figure><img src="/files/PBIwA8A7VAx7osTGXICE" alt=""><figcaption></figcaption></figure>


# Lists

<mark style="color:$primary;">**You can access the  Lists category via the left sidebar.**</mark>

The **Lists** category serves as the central hub for all your data within the DRM platform. It includes information such as donors, locations, campaigns, reasons, and sources, making it an essential component for managing your data.

\
Each list is organized into separate **tabs**, with each tab containing the data relevant to that category. For example, under **Donors**, you’ll find your entire donor database. While the content may vary between tabs, all lists share a consistent layout and set of tools for easy navigation and management.

<details>

<summary><strong>Top bar tools:</strong> All List tabs share the same top bar, which includes:</summary>

<figure><img src="/files/nav3Ra94YHS9U3aAQFET" alt=""><figcaption></figcaption></figure>

1. **Search** – quickly locate specific records
2. **Filter** – refine and organize the list based on your criteria
3. **Total Panel** – opt to view panel with aggregated totals&#x20;
4. **Fields -** choose which columns to view&#x20;
5. **Actions menu** – enables different list-based actions

</details>

<details>

<summary><strong>Rows and entries</strong>: Each list is made up of rows, with each row representing a single data entry. </summary>

Each row has a **purple-highlighted item** that depends on the list type—for example, the Donors list shows the donor’s name, the Campaigns list shows the campaign name. Clicking it opens a **detailed card** to view and manage that entry.

<figure><img src="/files/iP2QaNzJD23skKZ1zI96" alt=""><figcaption></figcaption></figure>

You can open these cards from any table within the DRM by clicking the purple hyperlink.

</details>

This structure ensures that all lists in the platform are easy to access, consistent, and interactive, while giving a detailed view of every individual entry.


# Donors

## Overview

<mark style="color:$primary;">**You can access the Donors tab via the Lists category in the left sidebar.**</mark>

The **Donor List** is your comprehensive hub for all donor-related information, where you can easily add, find, and edit details for any donor. Each donor profile includes all essential information needed such as contact details, donation history and more.&#x20;

## Features

There’s a lot to explore in this section! Let’s take it one step at a time and dive into each feature the DRM offers under the Donor tab.

<table data-view="cards"><thead><tr><th align="center"></th></tr></thead><tbody><tr><td align="center"><a href="/pages/NLRQEqZCj6qeBN6mH0nz"><mark style="color:$primary;"><strong>Donor List View</strong></mark></a></td></tr><tr><td align="center"><a href="/pages/9jYkU4uueiqv8vKtuwFD"><mark style="color:$primary;"><strong>Add A Donor</strong></mark></a></td></tr><tr><td align="center"><a href="/pages/ApQHPjGLLN9AGFejHlJV"><mark style="color:$primary;"><strong>Donor Card</strong></mark></a></td></tr></tbody></table>


# Donors List View

## **Overview**

The **Donor List View** can be adjusted, allowing each user to tailor how donor information is displayed to match their preferences.

The default donor list view displays five standard fields, in this order: **Full Name, Family, Phone, Address,** and **Email**. Learn how you can customize this view to suit your needs.

## **Top Bar tools**

The Top bar of the donor list contains various tools to customize and manage your view. They are listed below in the order they appear, from left to right:

<figure><img src="/files/OEsLaD9wCvlfO6zP8vpY" alt=""><figcaption></figcaption></figure>

### 1. Search

The search field allows you to search using any data. The results will display all donors whose information contains the entered search terms.

***

### 2. Filter / Sort

#### <mark style="color:$primary;">**Filter**</mark>&#x20;

Use the filter to quickly segment donors by various criteria.

1. Click the **Filter** button.
2. In the Filter card that appears, choose your filter(s):
   * **Advanced Fields:** Select one or more fields from the dropdown.
   * **Account No.:** Filter by donor account number.
   * **Full Name / Full Name (Hebrew):** Filter by English or Hebrew name.
   * **Address:** Filter by city and/or ZIP code.
   * **Default Location:** Filter by donor’s default praying location.
   * **Phone / Email:** Filter by phone number or email/domain.
   * **Father / Father-in-Law:** Filter by father’s or father-in-law’s name.
   * **Status:** Filter donors by **Active** or **Inactive**. By default, the list is filtered to **Active** donors.
   * **Tags:** Filter by tags.
3. Click **Search** to apply.

The **Filter** button shows how many filters are currently active.

<div align="left"><figure><img src="/files/YHMbqMtBq1KhuznVUqbN" alt="" width="375"><figcaption></figcaption></figure></div>

To remove all filters, click the **Filter** button and select **Clear All Filters**.

{% hint style="warning" %}
**Note:** By default, the list shows only **Active** donors. If **Clear all filters** is selected, **Inactive** donors will also appear. The user should remember to reselect **Active** donors as needed.
{% endhint %}

#### <mark style="color:$primary;">**Sort**</mark>

**To sort your list:**

* Click on the **column title**.
* An **arrow** will appear next to the title. <img src="/files/XpvkqJpB6qGw2joyes9h" alt="" data-size="line">
* Click the arrow to sort the column in either **ascending** or **descending** order.

***

### 3. Refresh

The Refresh button allows you to **synchronize** your DRM donor list with all other Donary devices. Any donor added via the Pocket Processor or mobile device will be updated on the DRM platform once you click **Refresh**. The DRM also displays the date and time of the last refresh, helping you stay up to date.

<div align="left"><figure><img src="/files/FzNYBCaQB7PIqqP0hJmZ" alt="" width="393"><figcaption></figcaption></figure></div>

***

### 4. Total Panel

The **Total Panel** lets you view donation totals based on various selectable criteria.

By default, the panel is hidden. To see this panel, click on **Show Total panel**. <img src="/files/opoHyhXx86DffkB698qn" alt="" data-size="line">

Further explore the different parts of the panel [here](/overview/lists/donors/donors-list-view/total-panel-view).

***

### 5. Fields

#### <mark style="color:$primary;">**Show/Hide columns**</mark>&#x20;

• Select the Fields button, then check or uncheck the boxes next to each column name to display or conceal  that column.&#x20;

#### <mark style="color:$primary;">**Change Order**</mark>&#x20;

• Drag and drop the names of the columns to rearrange the displayed column order. <br>

***

### 6. Actions menu

The **Actions** menu is the last option in the top-right corner of the Donors view and is accessed via the **three-dot icon**. It provides several list-level actions, outlined below.

#### <mark style="color:$primary;">**Import**</mark>

The **Import** option allows you to upload donor data into the system. For more information, see the following articles: [**Import a Donor**](/overview/lists/donors/add-a-donor/import-a-donor) and [**Import a Token**](/overview/lists/donors/add-a-donor/import-a-token).

#### <mark style="color:$primary;">**Export to Excel**</mark>

To download your donor list as an Excel file, click **Excel**.\
The file will automatically download all currently displayed entries to your computer’s default **Downloads** folder.

If you need the export to include additional columns, be sure to add them to the view before clicking **Excel**. You can add more fields by clicking the [**Fields** ](#fields)button.

#### <mark style="color:$primary;">**Merge donors**</mark>

The **Merge** option is used when two or more donor records belong to the same person and need to be combined into a single record. See more details [here](/overview/lists/donors/donors-list-view/merge-donors).

#### <mark style="color:$primary;">**Save layout as default**</mark>

Select **Save Layout as Default** to store your current view settings—such as filters, sorting, and layout preferences.\
The next time you open the Donors list, it will load with these saved settings applied automatically.


# Total Panel View

## **Overview**

The **Total Panel** **view** is a fast, easy-to-use reporting tool that provides a high-level summary of donor activity and totals. It allows you to quickly understand donation amounts, payment status, and future commitments, with powerful filtering options to focus on exactly what you need.

For each donor, the Total Panel view can display:

* **Payments** – The number of payments that have already been processed
* **Open Pledges** – Outstanding pledged amounts that have not yet been paid
* **Scheduled** – Future payments and pledges that are scheduled to run
* **Total Donated Amount** – The **Total** amount is calculated as the sum of:

  &#x20;Completed payments + Open pledges + Scheduled payments and pledges

**Example:**\
If a donor has open pledges of $235, this amount will appear under *Open Pledges*.

<figure><img src="/files/MA5MpE8KDHZoirZR03mp" alt=""><figcaption></figcaption></figure>

## **Features**

**Let's explore the different parts of the panel:**

***

### <mark style="color:$primary;">**Panel Controls and Filters**</mark>

<figure><img src="/files/9f10Fbc9kke04XtlEt2q" alt=""><figcaption></figcaption></figure>

<figure><img src="/files/fPQnzhSoYa9Bjznkul1g" alt=""><figcaption></figcaption></figure>

#### **1. Filter**

Your filter options are by reason[^1], campaign[^2], [location ](#user-content-fn-3)[^3]or/and collector[^4]. The totals will show the results for the filtered items only.

The filter button will show how many filters are applied.

<div align="left"><figure><img src="/files/YHMbqMtBq1KhuznVUqbN" alt="" width="375"><figcaption></figcaption></figure></div>

To remove all filters, click the **Filter** button and select **Clear All Filters**.

{% hint style="info" %}
When you open a donor card after applying a filter, the donor card totals are **automatically pre-filtered** to match the selected filter.\
The totals shown on the donor card are intended to match the totals shown in the Total Panel.
{% endhint %}

#### **2.** Sum By & Total "Summed by" Cards

The **Sum By** option controls how the **Total "Summed by" Cards** are displayed.

When you select a value in **Sum By**, the [Total "Summed by" Cards ](#total-summary-cards)automatically update to show totals grouped by that selection. You can choose to view the sums by campaign[^2], reason[^1], location[^3], collector[^4], device or donor[^5].

**For example:** When **Campaign** is selected, a summary card appears for each campaign, in addition to a total summary card that reflects totals across all campaigns.

<figure><img src="/files/VaE0MABHhPlIlsmwf42H" alt=""><figcaption></figcaption></figure>

#### **3. Sort**

This feature allows you to sort the donor list either **alphabetically or by donation** **amount**.

<div align="center"><figure><img src="/files/q8o2wthIjkbiGRubm2FF" alt="" width="314"><figcaption></figcaption></figure></div>

#### **4. Date**

This feature lets you define the time period for which the totals will be calculated.&#x20;

You can select between the English or Hebrew calendar, choose from preset time frames, or set custom dates.&#x20;

Click **Apply** to save your selection.

<figure><img src="/files/KjUT4UXuAcpoIRfwAklv" alt=""><figcaption></figcaption></figure>

#### &#x20;**5. Show Only Active Donations**

Use the toggle to switch between viewing **only donors with active donations** or viewing **all donors**. When the toggle is **off**, the list includes both donors with **and** without donation history, with donors who have donations shown first. You may need to navigate to the next page to see donors without any donations.

This option is especially useful when filtering by campaign, as it allows you to identify donors who **did not donate** to the selected campaign—helpful for outreach and follow-ups.

#### &#x20;**6. Hide Total Panel**

Click this button to hide the **Total Panel**.

***

### <mark style="color:$primary;">**Total Summary Cards**</mark>

<figure><img src="/files/WwilJOdhPHwi4utwSNs3" alt=""><figcaption></figcaption></figure>

#### &#x20;**7. ALL Summary Card**

This card displays the total of **all donations** based on the selected timeframe and applied filters.

#### **8. Total "Summed By" Card(s)**

Displays totals grouped according to your [**Sum By** ](#id-2.-sum-by)selection (e.g., per campaign, reason, or collector).

When you click a card, the records are filtered to display only payments linked to that specific selection.

**Example:** When totals are grouped by **Campaign**, clicking a specific campaign card filters the donors list to show only donors who contributed to that campaign. The donations shown in the list are the same ones included in the total displayed on the card.

<figure><img src="/files/qV0MGbs2SoJCyOrSp7Be" alt=""><figcaption></figcaption></figure>

[^1]: A team in a charity drive (Donate +). Each team has an online page with a fundraising goal.

[^2]: The cause and purpose of the donation. Every donation is directed towards a specific cause AKA campaign.

[^3]: Where the donation was made.

[^4]: AKA fundraisers. Individuals that actually collect the money and donations.

[^5]: Individuals who have donated or are committed to donating money in the future.


# Merge Donors

The **Merge** option is used when two or more donor records belong to the same person and need to be combined into a single record.

Donors are considered the same if their **phone numbers** (regardless of label) are identical.

### **How merging works:**

1. Click **Merge** to open the merge card.
2. Search for and select a donor.
3. The screen will display:

* One **Primary Card** (the main donor record)
* One or more **Sub-cards** (donor records to be merged into the primary card)

If you want a sub-card to become the primary card, click **Swap**.

* The cards switch roles immediately.
* This action is fully reversible—click **Swap** again to switch back.

<figure><img src="/files/4wFUyhtniqjOzZeYfBXj" alt=""><figcaption></figcaption></figure>

4. Each card displays the donor's account number, name, and full details for review.
5. Click **Merge** on the desired sub-card.

When you click **Merge** on a sub-card, ALL its information is added to the primary card (including tags, advanced fields, locations etc.). You can merge multiple sub-cards into the same primary card.

**NOTE**: Each phone label can be used **only once** on a donor card. When donors are merged and both the primary and sub donor cards use the same phone label, the label remains on the primary donor card. The phone number from the sub-card is assigned a new label called **MISC**. This **MISC** label is created automatically during the merge and can be updated later by editing the primary donor card.

<figure><img src="/files/OKWqaVfXzrB5Ie03Ytkq" alt=""><figcaption></figcaption></figure>

The primary card displays a **number indicator** showing how many donor cards are currently selected for merging (for example, “1X” shows that 1 sub-card is selected for merging).

<figure><img src="/files/haO3Yh4zweveTXqtnDAq" alt=""><figcaption></figcaption></figure>

6. **Complete the merge.** Once everything looks correct, click **Process**.<br>

{% hint style="warning" %}
If a sub-card was merged by **mistake**:

* Click the number indicator on the primary card.
* All merged sub-cards will be separated again, and the primary card will revert to its original state.

<img src="/files/haO3Yh4zweveTXqtnDAq" alt="" data-size="original">
{% endhint %}


# Add a Donor

It’s important to add a donor correctly and include all relevant information at the initial stage to avoid missing details or confusion later on. Incomplete information can result in donors being overlooked when filtering or searching by segment.

<mark style="color:$primary;">**Donors can be imported in bulk or added individually.**</mark>

## Import

For full import instructions, see [Import ](/overview/lists/donors/add-a-donor/import-a-donor)article.

## To add a donor:

* Click the **"Create"** button in the [Quick Actions](/cloud-drm/getting-started/user-interface#section-c-quick-actions) section.
* Choose **"Donors"** from the dropdown menu.

<div align="left"><figure><img src="/files/4NUybujB3Qr16atQA3w5" alt="" width="259"><figcaption></figcaption></figure></div>

When creating a new donor in DRM, you start with the **Create Donor** card.&#x20;

This card includes several tabs that guide you through adding all relevant information for a donor. Once ALL the tabs are filled in, click **Save** to add the donor to your donor list.

Below is an overview of each tab and the actions you need to take:

### **Donor Info Tab**

The **Donor Info** tab must be completed before adding information to the other tabs. This tab contains all core donor details.

<figure><img src="/files/WNl4v5W1PQDB9eWMRYsv" alt=""><figcaption></figcaption></figure>

You can choose to fill in the donor’s information using the global list or enter it manually.

<i class="fa-hand-point-right" style="color:$primary;">:hand-point-right:</i> <mark style="color:$primary;">**Using the Global List:**</mark>

The system includes a **Global List**, maintained internally, which allows you to quickly populate donor information without manual entry.

**To use the Global List:**

1. Begin typing any donor information in the **Search Global Donor** field (e.g., phone number or name).
2. Click **Search**
3. Matching results from the Global List will appear.
4. Select a result to automatically populate the donor’s information.

This option is useful when full donor details are not readily available.

<i class="fa-hand-point-right" style="color:$primary;">:hand-point-right:</i> <mark style="color:$primary;">**Manual Entry:**</mark>

If you prefer, you can manually enter all donor details.

#### <mark style="color:$info;">**Name Fields**</mark>

* Yiddish First Name, Yiddish Last Name, Yiddish Title
* English First Name, English Last Name, English Title

#### <mark style="color:$info;">**Address Information**</mark>

* The **Street Address** field uses Google-powered address search to ensure accuracy.
* Begin typing the address and select from the suggested results.
* Click **+Add** to add additional addresses
  * Assign a label to each additional address (for example, **Business** or **Office**). A label is required for every address.
  * **Edit** labels by clicking the edit icon at the right of each label.
  * Click **+Add Label** to add labels as needed
  * Mark one address as **Primary**

<figure><img src="/files/Q32sA0C4Imch4hIn0oJw" alt=""><figcaption></figcaption></figure>

{% hint style="info" %}
**Primary Address:** This address determines the entity listed on the receipt for tax and deduction purposes. If receipts need to be issued under a business name (for example, for tax reporting), mark the business address as the Primary address.
{% endhint %}

#### <mark style="color:$info;">**Phone Numbers**</mark>

* Default labels include **Home** and **Cell**
* Click **+Add** to add additional phone numbers
  * Select existing labels or create new ones
  * Each phone number must have a label

<figure><img src="/files/wbtUeJtLvBbgIMc5E2Qj" alt=""><figcaption></figcaption></figure>

#### <mark style="color:$info;">**Email Addresses**</mark>

* Add one or more email addresses
* Assign labels to each email
* Create custom email labels if needed

<figure><img src="/files/bTIIEA5XJAE6O6YoiqYA" alt=""><figcaption></figcaption></figure>

***

### **Advanced Fields Tab**

The **Advanced Fields** tab displays all custom fields your organization has added to the DRM platform. These fields are additional to the default basic fields—such as full name, address, and email—that are included when the system is first set up.

Custom fields can be created in the [**Advanced Fields**](/cloud-drm/getting-started/setup-and-configuration/advanced-fields#custom-fields-features) section, accessible from the left sidebar under the **Admin** category. Examples of custom fields may include Mother’s Name, Member Type, or any other information your organization needs to track.

To complete the **Advanced Fields** tab:

1. Fill out the available custom fields relevant to the donor.
2. Once all required information is entered, proceed to the next tab.

<figure><img src="/files/wuQk3MA8zLFov5RNdgZH" alt=""><figcaption></figcaption></figure>

***

### **Family Tree Tab**

The **Family Tree** tab lets you build and view a donor’s family connections by linking related donors within the system.&#x20;

Relationships are bi-directional and **automatically synced**: when a relationship is added or updated (for example, adding a father), the corresponding relationship is instantly reflected on the related donor’s card (the father will display the donor as a son).&#x20;

This ensures family relationship data remains consistent and up to date across all linked donor records.

<figure><img src="/files/5QqeMmvv85ssgoxTW0C2" alt=""><figcaption></figcaption></figure>

#### <mark style="color:$primary;">**Complete Family Tree:**</mark>

You can choose to fill in a relative's name using the **global list** or using your organization's **donors list.**

<i class="fa-hand-point-right" style="color:$primary;">:hand-point-right:</i> <mark style="color:$primary;">**Using the Global List:**</mark>

* **Enable** global list search by toggling the G button.
* Begin typing any donor information (e.g., phone number or name).
* Click on the **Search** icon
* Matching results from the Global List will appear.
* Select the desired result.

<i class="fa-hand-point-right" style="color:$primary;">:hand-point-right:</i> <mark style="color:$primary;">**Using the Donor's list:**</mark>

* Start typing the name in the field
* Select correct name from the list

1. Add the father **אב** and father in law **חמיו** names in the relevant fields.
2. Add Additional Family Members&#x20;

* Click **Add Family Member**&#x20;
* You can add a Son **בנו** and/or Son-in-Law **חתנו**

3. To **remove** a name, simply click on the **X** that shows to the left of the relative title.
4. Once all required information is entered, proceed to the next tab.

{% hint style="info" %}
If the name is not yet in the system, you can create a new donor record and then link it here.
{% endhint %}

{% hint style="warning" %}
If a name is typed into a donor field without selecting an existing donor record, it is saved as **plain text** and is **not linked** to a donor profile.&#x20;

This applies only to the Father and Father-in-Law fields.
{% endhint %}

<figure><img src="/files/NtB62foc5Ik4kPxtNrs0" alt=""><figcaption></figcaption></figure>

***

### **Tags Tab**

The **Tags** tab allows you to assign one or more tags to a donor. Tags help you quickly organize, filter, sort, and report on donors based on short-term needs or temporary groupings.

Tags are created in the [**Advanced Fields**](/cloud-drm/getting-started/setup-and-configuration/advanced-fields#tags-features) section, accessible from the left sidebar under the **Admin** category. Once created, these tags become available for selection when creating or editing a donor. Examples of tags may include "Give Chanukah Gift", "Send invitation" etc.

#### <mark style="color:$primary;">**How to Add Tags to a Donor**</mark>

1. Click **Add a New Tag**.
2. Select a tag from the list of existing tags.
3. Repeat this process to add additional tags, if needed.&#x20;
4. If you add a tag by mistake, click the **X** on the tag to remove it.&#x20;
5. Once you’ve finished assigning tags, you can proceed to the next and final tab.

<figure><img src="/files/E21uZU4xnZiPs7wmJfv7" alt=""><figcaption></figcaption></figure>

***

### **Locations Tab**

The **Locations** tab allows you to specify where a donor regularly davens. This information helps collectors plan visits, generate lists of donors by location, and compare donation activity over time.

#### <mark style="color:$primary;">**Adding Locations**</mark>

You can add locations to a donor in one of two ways:

1. **From your organization’s locations list**
   * Click **Add Location**.
   * Select a location from your organization’s saved locations within the DRM platform.
2. **From the Global List**
   * Click **Add Location**.
   * Toggle the **G** icon to enable Global Search.
   * Begin typing the location name and click **Search**.
   * **Select** the appropriate location from the results.

**Remove** a location by clicking the red trash icon on the far right.

#### <mark style="color:$primary;">**Notes on Using Locations**</mark>

* **ALL** locations are available on the collector’s **pocket /** **mobile device,** including the Global list of locations.
* The pocket and mobile devices use **GPS** to identify the collector’s current location.

  When a donation is collected, the system automatically associates it with the collector’s detected location.
* Collectors may rely on GPS for automatic location assignment or **manually** select a location from the list as GPS accuracy is limited.
* Over time, the system learns donor behavior.\
  When a donor repeatedly donates at the same location, the system automatically recognizes this pattern and adds that location to the donor’s profile.
* Locations can be assigned to donors either:
  * Automatically, based on recurring donation patterns, or
  * Manually, by selecting a location in the DRM platform.
* This functionality enhances reporting and field efficiency.\
  When a collector arrives at a location, the device can display relevant donors associated with that location along with historical donation data, enabling more informed and effective visits.

<figure><img src="/files/qRFbR0VhZt51Jyu3kyJp" alt=""><figcaption></figcaption></figure>

***


# Import a Donor

The **Donors Import** feature allows you to add a large number of donors to the system at once, instead of entering them individually. This is ideal for importing existing donor lists or onboarding donors in bulk.

### Accessing the Donors Import

* In the left sidebar, navigate to **List**.
* Under the **List** category, click **Donors**.
* On the top-right corner of the Donors screen, click the **three-dot (More Actions) icon**.
* Select **Import**.
* Choose **Import Donors**.

### Import Method Overview

Donors are imported using an **Excel template**. The system automatically recognizes each column and creates donor records based on the data you provide.

To ensure a successful import, it is critical to use the provided template exactly as instructed.

### Excel Template Structure

* In the Import Donors window, click **Download Excel Template**.
* The file will automatically download to your computer’s Downloads folder.
* Open the file in Excel.
* Click **Enable Editing** to begin entering data.

{% hint style="info" %}
NOTE!&#x20;

* **Rows 1 and 2** cannot be **deleted** or **edited**, as they are required for the system to import the file correctly.
* **Rows** **3 and 4** in the spreadsheet contain **example entries,** and are provided as a formatting guide.
  {% endhint %}

### Column descriptions

Work from **left to right**, using the example rows as a guide for formatting.

#### <mark style="color:$primary;">Donor Account Number</mark>

* Enter a **unique donor account number**.
* This number **must not already exist** in your donor list.
* If an existing account number is used, **all donor information for that account will be** [**updated**](/overview/lists/donors/update-a-donor).
* The account number acts as the donor’s primary identifier.

{% hint style="info" %}
**NOTE:** Account numbers for imported donors cannot start with **DNR**. The **DNR** prefix is reserved for donors created directly in the DRM, where the system automatically assigns a default account number starting with **DNR**.
{% endhint %}

***

#### <mark style="color:$primary;">Donor Name (English)</mark>

* **Title (English)**: e.g., Mr., Mrs., Miss, Rabbi
* **First Name (English)**
* **Last Name (English)**

***

#### <mark style="color:$primary;">Donor Name (Hebrew / Yiddish)</mark>

* **Title (Hebrew/Yiddish)**: e.g., Harav
* **First Name (Hebrew/Yiddish)**
* **Last Name (Hebrew/Yiddish)**
* **Suffix (Hebrew/Yiddish)**: e.g., Shlita

***

#### <mark style="color:$primary;">Home Address</mark>

* **House Number**
* **Street**
* **Apartment**
* **City**
* **State**
* **ZIP Code**
* **Country**

Use the example row to ensure proper formatting.

{% hint style="success" %}
To customize the address label[^1], update the text **after the colon** in the column header.

For example: HouseNum:Home TO HouseNum:Office

**Important!** The label must be updated across ALL corresponding address columns for the import to process correctly.
{% endhint %}

***

#### <mark style="color:$primary;">Phone Numbers</mark>

**Home Phone**

* **Home Phone Country Code -** If left blank, the default is **USA**
* **Home Phone**&#x20;

**Cell Phone**

* **Cell Country Code -** If left blank, the default is **USA**
* **Cell Phone**&#x20;

Additional phone columns (e.g., Cell 2, other) can be used as needed.

{% hint style="info" %}
**Country Code** identifies the country associated with the phone number and ensures messages are sent with the correct international dialing code. For example, an Israeli phone number must use the **ILS** country code so the system knows to apply Israel’s dialing prefix when sending texts.
{% endhint %}

{% hint style="success" %}
To customize the Phone Number label[^1], update the text **after the colon** in the column header.

For example, CountryCode:Home **TO** Countrycode:Office

**Important!** The label must be updated in both the country code AND phone columns for the import to process correctly.
{% endhint %}

***

#### <mark style="color:$primary;">Email Addresses</mark>

* **Personal Email**
* **Business Email**

{% hint style="success" %}
To customize the email label[^1], update the text **after the colon** in the column header.

For example, Email:Business **TO** Email:Home
{% endhint %}

***

#### <mark style="color:$primary;">Family Tree Information</mark>

Family relationships appear on the donor card’s [**Family Tree**](/overview/lists/donors/add-a-donor#family-tree-tab) section.

<i class="fa-hand-point-right">:hand-point-right:</i> **Plain Text Entry**

* To display a name only, use the **Donors Father** and **Donors Father-in-law** columns. These fields are **display-only**—if they are filled in, the father or father-in-law will **not be linked** to the donor and will appear as text only.

<i class="fa-hand-point-right">:hand-point-right:</i> **Linked Donor Accounts**

* To display a linked name, use the **Donors Father Account Number** and **Donors Father-in-law** **Account Number** columns. The referenced account numbers can belong to donors listed anywhere in the import file (for example, in another row) and do **not** need to be pre-existing donors in the DRM.&#x20;
* Enter the **related donor’s account number**.
* This creates a **clickable hyperlink** to that donor’s card.

<details>

<summary>See family tree in Donors card:</summary>

<figure><img src="/files/BNjK6guBigXEX5SiKQYB" alt=""><figcaption></figcaption></figure>

</details>

***

#### <mark style="color:$primary;">Custom Fields</mark>

The template includes predefined [custom field](/cloud-drm/getting-started/setup-and-configuration/advanced-fields#custom-fields-features) columns.

* To **rename** a custom field:
  * Edit the column header **after the colon**.

{% hint style="info" %}
This will create a new custom field in the DRM
{% endhint %}

***

#### <mark style="color:$primary;">Tags</mark>

* You may assign **multiple** [**tags** ](/cloud-drm/getting-started/setup-and-configuration/advanced-fields#tags-features)to a donor.
* Separate tags with a **comma**.

{% hint style="info" %}
This will create a new tag in the DRM
{% endhint %}

***

#### <mark style="color:$primary;">Location IDs</mark>

* Enter the **Location ID** (not the location name).
* Please contact Customer Support to obtain the required Location IDs.
* Multiple [locations ](/overview/lists/donors/add-a-donor#locations-tab)may be assigned by separating IDs with commas.

***

#### <mark style="color:$primary;">Business Address</mark>

If applicable, fill in:

* **Business Name**
* **House Number**
* **Street**
* **Apartment**
* **City**
* **State**
* **Zip Code**
* **Country**

{% hint style="info" %}
The **business address** will be used for **tax** purposes if the donor requires a receipt issued to their business.
{% endhint %}

***

#### <mark style="color:$primary;">Adding Additional Addresses</mark>

* To add more addresses:
  * Copy columns **AI through AP**
  * Paste them starting in column **AQ** and onward
* Each copied set represents an additional address.

***

### Uploading the File

1. Save and close the completed Excel file.
2. Upload it through the Import Donors window.

Once the upload begins:

* The system processes the file automatically.
* The user who initiated the import will receive an **email notification** with the import status.
* If any errors occur, the email will include details.

[^1]: A category for a phone number, email, or address that defines its type. In example: **Home**, **Business** etc.


# Import a Token

The **Tokens Import** feature allows you to bulk-import saved payment methods for donors. A **token** is a secure, random string of characters (a digital substitute) provided by the processing company and represents a credit card that a donor has already saved with the processor.&#x20;

If you have the **actual credit card numbers**, you may import those card numbers directly instead of a token.

This import is typically used when migrating data from another system or syncing existing stored payment methods into the platform.

The payment information—whether entered as a credit card number or token—will be saved to the donor’s virtual [**wallet**](/overview/lists/donors/donor-card/wallet) for future use.&#x20;

{% hint style="danger" %}
**At this time, tokens are supported only by the following gateways:**&#x20;

Cardknox, USAePay, Cardcom, Pelecard, and Banquest.
{% endhint %}

### Accessing the Tokens Import

* In the left sidebar, navigate to **List**.
* Under the **List** category, click **Donors**.
* On the right side of the Donors screen, click the **three-dot (More Actions) icon**.
* Select **Import**.
* Choose **Import Tokens**.

### Import Method Overview

Tokens are imported using an **Excel template**. Each row in the file represents **one saved credit card** linked to an existing donor.

The system uses the donor account number to associate each token with the correct donor record.

### Excel Template Structure

* In the Import Tokens window, click **Download Excel Template**.
* The file will automatically download to your computer’s Downloads folder.
* Open the file in Excel.
* Click **Enable Editing** to begin entering data.

### Column Descriptions

#### <mark style="color:$primary;">Donary Account</mark>

* Enter the **existing donor’s account number**.
* This donor **must already exist** in the system.
* The token will be linked directly to this donor’s card, under wallet.

***

#### <mark style="color:$primary;">Credit Card Number</mark>

* Enter the actual **credit card number.**
* This column accepts credit card numbers only—**not tokens**.
* This will be saved as a payment method for future transactions.
* When entering a credit card number, do NOT fill in the token column.

***

#### <mark style="color:$primary;">Card EXP</mark>

* Enter the **card expiration date**.

***

#### <mark style="color:$primary;">Token</mark>

* Enter the **token value provided by the processor**.
* This is the unique identifier representing the stored credit card.
* The token is required for processing future charges using the saved card.

{% hint style="warning" %}
**Important:** The **Credit Card Number** and **Token** columns are two different ways to import a card to the donor's wallet.

Each entry must include either a **Credit Card Number** OR a **Token**, but not both.&#x20;

You CAN include both types of entries in the **same** import.
{% endhint %}

***

### Uploading the File

1. Save and close the completed Excel file.
2. Upload it through the Import Tokens window.

Once the upload begins:

* The system processes the file automatically.
* The user who initiated the import will receive an **email notification** with the import status.
* If any errors occur, the email will include details.


# Donor Card

## Overview of Donor Card

The **Donor Card** provides a comprehensive view of a donor’s information, transactions, and activity. It also allows you to manage your donor's transactions, reminders and details in one place. This article breaks down the features and functionalities of the donor card.

Click the **donor’s name** (shown as a purple hyperlink) in the Donors list to open the donor card. The donor card can be accessed this way from any page within the DRM.

<figure><img src="/files/xsyCWei12YUswTY2xESm" alt=""><figcaption></figcaption></figure>

***

## Totals Filter

#### <mark style="color:$primary;">**Filter**</mark>

The **Filter** button allows you to segment **totals** shown on the donor card, including payments, open pledges, and scheduled cards. You can filter totals based on:

* Reason
* Campaign
* Location
* Collector

<div align="left"><figure><img src="/files/YHMbqMtBq1KhuznVUqbN" alt="" width="375"><figcaption></figcaption></figure></div>

This dynamically updates the [**totals** ](#totals)displayed.

#### <mark style="color:$primary;">**All Time**</mark>

The **All Time** dropdown lets you choose a specific time frame for viewing [**totals**](#totals), making it easier to track activity over days, weeks, months, or custom periods.

<div align="left"><figure><img src="/files/qPN9EAxgIpZXg5T0XvCj" alt="" width="375"><figcaption></figcaption></figure></div>

***

## Actions

#### <mark style="color:$primary;">**Generate reports**</mark>

The **Generate Report** button allows you to create detailed statements for this donor. This feature is covered in a separate article. See more information [here](/overview/lists/donors/donor-card/generate-report).

<figure><img src="/files/JnchNs4dMtbZR3Jo1uqc" alt=""><figcaption></figcaption></figure>

#### <mark style="color:$primary;">**Edit Donor**</mark>

Clicking **Edit** opens the edit donor card, similar to the create donor card. Here, you can [update ](/overview/lists/donors/update-a-donor)any donor information. Once changes are made, click **Save** to update the donor’s record.

<figure><img src="/files/UE81EekSWDXNQa4XJnGH" alt=""><figcaption></figcaption></figure>

#### <mark style="color:$primary;">**Create New Transaction / Reminder**</mark>

You can create a **New Transaction** or **Reminder** by clicking this button:

<figure><img src="/files/l9bAThrpgV4Q0CkCwyyL" alt=""><figcaption></figcaption></figure>

<i class="fa-hand-point-right" style="color:$primary;">:hand-point-right:</i> <mark style="color:$primary;">**New Transaction**</mark>

A new transaction created through the donor's card will automatically be associated with that donor and all the donors information will be pre-filled. See [here ](/overview/lists/donors/donor-card/new-transaction)for information on how to create a new transaction.

<i class="fa-hand-point-right" style="color:$primary;">:hand-point-right:</i> <mark style="color:$primary;">**Add Reminder**</mark>

This feature allows a user to create a reminder to follow up with a donor for a specific reason. See [here ](/overview/lists/donors/donor-card/add-a-reminder)how to create a reminder.&#x20;

***

## Totals&#x20;

Get a quick and accurate view of each donor’s total donations.\
The **Totals cards** display cumulative amounts for each transaction type, as listed below:

<figure><img src="/files/qNY8cloTNjOr6DCpX2cx" alt=""><figcaption></figcaption></figure>

Clicking a card opens a window showing all records that make up the total displayed.

Let's explore the different[ totals cards](/overview/lists/donors/donor-card/total-cards).

***

## Information Tabs&#x20;

Let's walk through the different information tabs and what they contain:

<figure><img src="/files/rSAcwoZ7L8mZG6OcRpOQ" alt=""><figcaption></figcaption></figure>

{% tabs %}
{% tab title="Donor info" %}
Displays all **basic information** for the donor.
{% endtab %}

{% tab title="Advanced fields" %}
This tab displays additional donor information captured through the [custom fields](/cloud-drm/getting-started/setup-and-configuration/advanced-fields#custom-fields-features).
{% endtab %}

{% tab title="Tags" %}
This tab displays all [tags ](/cloud-drm/getting-started/setup-and-configuration/advanced-fields#tags-features)linked to this donor.
{% endtab %}

{% tab title="Wallet" %}
This tab provides information about your virtual wallet. For more details, please refer to the full article [here](/overview/lists/donors/donor-card/wallet).
{% endtab %}

{% tab title="Locations" %}
This tab displays all the [locations ](/overview/lists/donors/add-a-donor#locations-tab)where the donor typically davens.
{% endtab %}

{% tab title="Family tree" %}
The [family tree](/overview/lists/donors/add-a-donor#family-tree-tab) displays the donor’s family connections:

* Father, father-in-law, son, son-in-law, etc.
* Clicking any name opens that donor’s card
  {% endtab %}

{% tab title="Logs" %}
In the Logs tab, there are two sections: Statement Logs and Donor Edit Logs.

* **Statement Logs** display when statements or reports were generated via print, email, SMS or mail, along with all relevant details.
* **Donor Edit Logs** record all edits made to a donor, including what was changed and the exact time of the update.

These logs help you track activities, monitor changes, and understand what happened and when.
{% endtab %}

{% tab title="Reminders" %}
Shows all active **reminders** associated with this donor.
{% endtab %}
{% endtabs %}

This structure ensures the donor card is both actionable and easy to navigate, providing a clear picture of the donor’s information, activity, and associated reminders.


# Generate Report


# Wallet

## Overview

The Virtual **Wallet** is located in the **Information** **tabs** within the **Donor Card**.

<figure><img src="/files/aIFiQ1GDPdUFwnIdJLxM" alt=""><figcaption></figcaption></figure>

The Virtual **Wallet** securely stores a donor’s preferred payment methods, making future donations faster and easier.

For donors, this removes friction from the giving process. Instead of repeatedly providing card details, the organization can create the payment using a saved payment method already on file. If multiple payment methods exist, the organization can confirm with the donor which card to use (for example, “the card on file ending in 0236”) and complete the transaction in seconds.

By reducing effort at the moment of donation, the Virtual Wallet makes it easier for donors to say “yes” again—while enabling organizations to process donations more quickly and efficiently.

{% hint style="warning" %}
**Note:** The wallet is saved only on the DRM and mobile device. For all Donary devices and platforms, there is currently no option to select a donor’s card on file.
{% endhint %}

## Managing a Donors Wallet

### **Adding Payment Methods**

Payment methods can be added to the virtual wallet in two ways:

1. **Import - Tokens** or **Credit card numbers** can be added by a **bulk import**. See [Import Tokens](/overview/lists/donors/add-a-donor/import-a-token).
2. **Manually** within the donor card:

   * In the **Wallet tab,** click **Add Method**.
   * Choose the payment type:&#x20;
     * **Credit Card**\
       Enter the card information along with the billing address.
     * **ACH**\
       If your Donary account is set up to accept [ACH ](/cloud-drm/getting-started/setup-and-configuration/api-keys/achq-processing)payments, enter all the relevant information here.&#x20;
     * **Token**\
       If you have a [token ](#user-content-fn-1)[^1]from a processing account, you can enter it here.&#x20;

   <figure><img src="/files/kh6K2tUIO5Z3gCvW0tDw" alt=""><figcaption></figcaption></figure>

   * Choose if you'd like the method to be your **default payment** method.
   * **Save** your payment method.
   * A donor can have **multiple** payment methods saved to his virtual wallet.

{% hint style="success" %}

* **When creating a schedule:** The card used will automatically be saved to the donor’s wallet.
* **When a payment is declined:** The system will automatically save the card to the wallet, allowing the organization to retry the payment.
  {% endhint %}

### **Default Payment Method**

* The first payment method added is automatically set as the **default payment method**.
* You can **change** the default at any time by selecting a different payment method in the wallet and marking it as default.
* The default payment method is used for **bulk transactions**, where multiple donors are selected for a transaction. When performing a bulk transaction, the system **automatically uses each donor’s default payment method**.

### **Removing Payment Methods**

* Payment methods can be removed from the virtual wallet by selecting the method and clicking on **Remove from Wallet**.
* A payment method **cannot be removed** **while it is linked to an active schedule.**\
  To remove it, first update the schedule to use a new wallet.

<figure><img src="/files/1Q7TrFQKkcAqNpLZnMxI" alt=""><figcaption></figcaption></figure>

[^1]: A token is a value provided by the processing company. It represents the credit card that the donor has saved with the processor.


# New Transaction

{% tabs %}
{% tab title="Donor Info" %}
All Donor information in this section is already filled in.
{% endtab %}

{% tab title="Amount" %}
Enter **donation amount**. (Manual amount or preset amount)
{% endtab %}

{% tab title="Payment Type" %}
**Choose Payment Type**.&#x20;

Payment type indicates how the donation is made.

Each payment type will prompt different fields to fill in:

#### Credit card <img src="/files/h2MOSLHwXWFFsu1LpMmL" alt="" data-size="line">

Enter credit card details.

#### ACH account <img src="/files/NXe8tyvEDnmZmcZp3Hv0" alt="" data-size="line">

Make sure your ACH account is set up so that you can use this option (<mark style="color:red;">link</mark>). Once it is set up, enter Bank account details.&#x20;

#### Charity Cards <img src="/files/HZC75ClWz5HrLXdjy9T6" alt="" data-size="line">

Enter the charity card number and expiration date.

#### Cash <img src="/files/FjJClkwOHVcQJhceA7dN" alt="" data-size="line">

#### Check <img src="/files/6l7oXeNWyLDPONvauhum" alt="" data-size="line">

Enter check number.

#### Pledge <img src="/files/Yhtuizx3NKyTXmqv07sk" alt="" data-size="line">

For a pledge, you must select a **campaign** and set a pledge **date**.&#x20;

These can be updated in the Options shown on the right side of the New Transaction card.

Add an internal and an external note. **Internal notes** are visible only to DRM users, while **external notes** appear on the donor’s pledge bill.&#x20;

#### Wallet <img src="/files/Rk8Dk1RqBGnyUfyIUl8m" alt="" data-size="line">

Choose any of the Credit cards saved in the donors virtual [wallet](/overview/lists/donors/donor-card/wallet).&#x20;

#### Other <img src="/files/5HVdjxnvJFkZziR00icl" alt="" data-size="line">

Fill in a reference title for other types of payment. For example, QuickPay.
{% endtab %}

{% tab title="Options" %}
In this tab, select the Reason, Campaign, Location and Collector from their respective dropdowns.

**This associates the transaction with the selected entries.**
{% endtab %}

{% tab title="Schedule Payment" %}

* Toggle the **Set Schedule** button to enable [scheduled payments](#user-content-fn-1)[^1].
* Enter the **total donation amount** and the **number** of payments. The system will automatically calculate the amount per payment.
* Select the payment frequency (daily, weekly, etc.) and the start date.
* Click **Next**.
* In the **Payment Type** tab, choose how the payments will be processed.
* Click **Process** to complete the setup.
  {% endtab %}

{% tab title="Pay Off Pledge" %}

* Toggle the **Pay Off Pledge** button to enable a pledge payoff.
* Review the displayed amounts: the total to be paid off, amounts available for payment, and amounts already applied to pledges.
* If no amount is available for payment, enter the payment amount in the **Amount** tab on the left side of the new transaction card. The available amount will update accordingly.
* On the right side, under **Pay-Off Pledge**, select the pledge to pay off by checking the box next to it. The applied amount will update to reflect the portion of the pledge being paid.
* Click **Next**.
* On the left side of the transaction card, choose the **Payment Type**.
* Click **Process** to complete the transaction.
  {% endtab %}
  {% endtabs %}

## Creating a New Transaction

A transaction can be created in one of two ways:

* Click **New Transaction** button from the main interface.
* Open a **donor card**, select the **"+"** icon **(Actions)** in the upper right hand corner , and then select **New Transaction**.

The transaction flow is divided into **three main steps**:

1. **Donor Information**
2. **Amount**
3. **Payment Type**

<figure><img src="/files/GPM9nntaXWB5wSVurHDh" alt=""><figcaption></figcaption></figure>

When adding a **new transaction via the donors card**, the donor information will be **prefilled** and you can skip directly to [Step 2: amount](#step-2-amount).

You can move through these steps sequentially by clicking **Next** to complete the transaction.

***

### \*\*\* Step 1: Donor Information

You can search for an existing donor using a **phone number** or **name** (Hebrew or Yiddish).

#### If the donor is not found:

* You can use the **G-List** (Global list).
* Alternatively, you can **add a new donor** directly. The phone number will be prefilled; only the name is required.
* You may also choose to enter a **display name only**. This creates a transaction with a display name but **does not create a donor record**.

You may also choose to **Skip Donor Info**, unless the transaction type requires a donor (see below).

***

### Step 2: Amount

* Select a **preset amount** or **manually enter** a custom amount.

<figure><img src="/files/AJex76KNCgZZAXWuvqi4" alt=""><figcaption></figcaption></figure>

* Choose the **currency**.

<figure><img src="/files/ygky3kMNTkVAMk0szQed" alt=""><figcaption></figcaption></figure>

{% hint style="info" %}
The **default** currency is defined when your account is set up.&#x20;

Currencies which are enabled via [API keys](/cloud-drm/getting-started/setup-and-configuration/api-keys/setting-up-api-keys#currency), (e.g., USD, CAD) will be available.
{% endhint %}

***

### \*\*\*Step 3: Payment Type

Select one of the available payment types:

#### <mark style="color:$primary;">Credit Card</mark>

* If a card swiper is connected, you may swipe the card to auto-fill card details.
* The system automatically detects card types such as:
  * **Charity Cards**
  * **OJC (Donor-Advised Funds)**
* You may manually enter any card number; detection is used for display and processing only.

#### Other Payment Types

* **Cash**
* **Check** (requires a check number)
* **Pledge** (a promise to pay at a later time; requires a campaign)
* **Wallet** (card on file from the donor profile)
* **ACH** (if enabled)

> **Note:** Scheduled payments cannot be created using cash or checks. Only payment methods that ensure future collection (e.g., credit card or ACH) are allowed.

#### Notes

* **Payment Notes** are **internal only** and are not visible to donors.
* **Pledges** support:
  * **Internal Notes** (for staff use)
  * **External Notes** (visible to the donor)

{% hint style="info" %}
You can **save a card** to the donors virtual **wallet** for future use by checking off **Save Card.**
{% endhint %}

***

## Notifications: Email and SMS

#### Email Receipts

* If enabled in [**Settings**](/cloud-drm/getting-started/setup-and-configuration/settings#send-automatic-email), email receipts are selected by default.
* You can edit the recipient email or add a new one.

#### SMS Receipts

* SMS notifications must be selected **manually** each time.
* You must choose or add the phone number for SMS delivery.
* There is no default setting to automatically send SMS receipts.

***

## Options

After selecting a donor, you can configure additional transaction details:

* **Reason**
* **Campaign**
* **Location**
* **Collector**
* **Record Date**

This associates the transaction with the selected entries.

#### Record Date vs. Created Date

* **Created Date**: When the transaction is created.
* **Record Date**: Used for reporting purposes only.
* Changing the record date **does not schedule or delay payment processing**.

{% hint style="warning" %}
You can save default values for **reason, campaign, location or collector** to be prefilled in future transactions by clicking the star by **Save settings as a default**.
{% endhint %}

***

## \*\*\*Scheduled Payments

To create a scheduled payment:

1. Enter the **amount per payment**.
2. Choose either:
   * Number of payments, or
   * Total donation amount (the system will recalculate accordingly).
3. Select a **frequency**:
   * Daily, Weekly, Bi-Weekly, Monthly, etc.

#### Calendar Options

* **English calendar**: Payme0nts run on a fixed calendar date (e.g., the 1st of each month).
* **Hebrew calendar**: Payments run on a specific Hebrew date (e.g., Chof-Beis).

Scheduled payment settings (frequency, count) may be saved as defaults.

> **Important:** A donor **must** be selected for scheduled payments and pledges. Skipping donor selection is not allowed.

***

## Paying Off Existing Pledges

If the selected donor has **open pledges**, a popup will appear:

<figure><img src="/files/PiQ3i4Olcbo2910mSku4" alt="" width="485"><figcaption></figcaption></figure>

Click on **Pay Off Pledge** and enable the Pay off Pledge toggle button: <img src="/files/iYTTMayy3gi3afBYVeei" alt="" data-size="line">

The system allows you to:&#x20;

* **View** all open pledges
* **Auto-apply** payments
* **Manually** select pledges and amounts
* **Filter** pledges by type or date range

\*\*\*The system will show:

* Amount applied
* Remaining balance
* Total outstanding pledges

***

### \*\*\*After Payment Completion

Once a transaction is completed:

* You will see whether **email or SMS receipts** were sent successfully.
* Click the **receipt number** to:
  * View or edit the transaction
  * Void the transaction
* Use **Quick Actions** to:
  * Download receipts
  * Resend email or SMS
  * Start a new transaction

***

### \*\*\*Scheduled Payment Authorization

If a scheduled payment starts on a future date:

* The system performs a **$0 or $1 authorization** to verify the card.
* If authorization fails, users may choose to:
  * Go back and edit the card
  * Proceed **without authorization** (available for specific gateways only)

This option exists because some donors may not have sufficient funds at the time of setup but will at the scheduled run date.

[^1]: A scheduled payment is a payment set to be processed automatically on a specific date or at regular intervals, such as weekly or monthly. On each scheduled date, the donor’s card is automatically charged.


# Add a Reminder

A **reminder** can be used to follow up with a donor for a specific purpose, such as a pending pledge, a declined credit card or a planned outreach. It helps ensure timely communication and keeps important follow-ups from being overlooked, allowing you to manage donor interactions in an organized and consistent way.

## To add a reminder:

Click the [**Actions** ](/overview/lists/donors/donor-card#actions)button in the top-right corner of the donor card.

<figure><img src="/files/l9bAThrpgV4Q0CkCwyyL" alt=""><figcaption></figcaption></figure>

1. Add a **Title** to the reminder (e.g., “Call @ declined Credit Card”).
2. Assign the reminder to a user using the **Assignee** field.&#x20;

   The assigned user will see the reminder in their **Reminders** tab and can be notified via text or email, ensuring they stay informed and take action on it.&#x20;
3. The reminder will automatically be linked to the donor for whom it is being created.
4. Optionally, link the reminder to a specific payment or pledge.
5. Set the **Date** for the reminder to trigger.
6. Choose the **Occurrence** in the **repeat** field (e.g., daily, weekly etc.).&#x20;

   A new reminder is created each time according to the schedule, even if the previous reminder hasn’t been completed.
7. Select whether to receive the notification via **Text** or **Email**.
8. Click **Save** to create the reminder.

{% hint style="info" %}
**PLEASE NOTE**:&#x20;

* The reminder will be visible **only** to the designated assignee.
* Reminders are for **internal** use only and do not notify the donor.
  {% endhint %}

The reminder will now appear in the **Reminders** tab within the donor card, where it can be easily viewed and managed.

<figure><img src="/files/gWyJkmBY3quOnihf332v" alt=""><figcaption></figcaption></figure>

{% hint style="info" %}
If a reminder is linked to a specific payment or pledge, it will appear in the corresponding payment or pledge card.
{% endhint %}

## To manage a Reminder:

You can easily manage and update your reminders by following these steps:

* Click the **small arrow** on the far right of the reminder entry.
* A panel will open on the right side of the screen, showing the reminder's details.
* **Review** all reminder details.
* **Edit** the reminder as needed.
* **Update** the assignee, adjust the time or occurrence, and add a note or comment for additional context.
* **Delete** the reminder using the trash icon at the top of the window.
* To stop a reminder from recurring, select **End Recurring**.&#x20;
* Mark the reminder **Complete** once the issue is resolved and the reminder is no longer needed.&#x20;

{% embed url="<https://drive.google.com/file/d/14MoJ_D97LSiYTYPNy7adPMRDvDqAgeMV/view?usp=sharing>" %}
Add and manage a reminder in a donors card
{% endembed %}

{% hint style="success" %}
Reminders can also be managed in the **Notifications** category, under the **Reminders** tab.
{% endhint %}


# Total cards

The totals cards give a quick and accurate view of each donor’s total donations.\
The **Total cards** display cumulative amounts for each transaction type, as listed below:

<figure><img src="/files/bhIL8jZKdHdegagTNG7x" alt=""><figcaption></figcaption></figure>

***

## <i class="fa-hand-point-right" style="color:$primary;">:hand-point-right:</i> <mark style="color:$primary;">**Total Payments card**</mark>&#x20;

This card displays the **total** [**payments** ](#user-content-fn-1)[^1]processed from this donor.

Click the **Payments** card to open a window showing ALL records that make up the total.

In this window, you can:

<figure><img src="/files/RqY2D94pXVDLGaNZ7CxF" alt=""><figcaption></figcaption></figure>

* **Search** entries using details such as the card ending, amount, or receipt number.
* Filter by time frame via **All Time** field
* Choose how many **Entries** to show per page
* **Filter** by payment status. By default, the list displays transactions with a **Success** or **Deposited** status.\
  Click the payment status field to view the full list of statuses, then select the desired ones.
* **Fields** - Adjust visible **columns**

*<mark style="color:$primary;">Clicking the</mark> <mark style="color:$primary;"></mark><mark style="color:$primary;">**purple hyperlink**</mark> <mark style="color:$primary;"></mark><mark style="color:$primary;">(Receipt number) in any entry will open that transaction record.</mark>*

<figure><img src="/files/0OctCTj1wlmx5t2Vf3dF" alt=""><figcaption></figcaption></figure>

<details>

<summary><strong>Payment Transaction record</strong></summary>

The transaction record will display **all** the information for that payment.&#x20;

There are several actions that you can take:

<figure><img src="/files/E21Ma6FRN8dQup7tAiqy" alt=""><figcaption></figcaption></figure>

* **Edit** payment  <img src="/files/VmnZPUvLYzFMak0gYjab" alt="" data-size="line">
* [New Transaction / Add Reminder](#create-new-transaction-reminder) <img src="/files/qGMdZvNXor5CfgO0iY0Z" alt="" data-size="line">
* **Void and Refund** Payment <img src="/files/9W6nCUMGNgcMiT5xtzeP" alt="" data-size="line">
* **Actions** - Print/Text/Email/Mail receipts  <img src="/files/WO7v68DL21OzsVgvF9fR" alt="" data-size="line">

</details>

***

## <i class="fa-hand-point-right" style="color:$primary;">:hand-point-right:</i> <mark style="color:$primary;">**Total Open Pledges**</mark>&#x20;

This card displays the **total open** [**pledges** ](#user-content-fn-2)[^2]from this donor.

Click the **Open Pledges** card to open a window showing ALL records that make up the total.

In this window, you can:

<figure><img src="/files/RqY2D94pXVDLGaNZ7CxF" alt=""><figcaption></figcaption></figure>

* **Search** entries using criteria such as pledge number, donor name, or pledge amount.
* Filter by time frame via **All Time** field
* Choose how many **Entries** to show per page
* **Filter** by pledge status. By default, the list displays pledges with an **Open, Running** or **Partially paid** status. \
  Click the Pledge status field to view the full list of statuses, then select the desired ones.

<details>

<summary><em><strong>Running status:</strong> If a payment schedule is paying off a pledge, the pledge is considered paid and will have a status of ‘Running,’. This will be reflected in the Open Pledges card AND in the list of pledges.</em> </summary>

<figure><img src="/files/9X66hZCrXhwLD7iInCaT" alt=""><figcaption></figcaption></figure>

</details>

* **Fields** - Adjust visible **columns**

*<mark style="color:$primary;">Clicking the</mark> <mark style="color:$primary;"></mark><mark style="color:$primary;">**purple hyperlink**</mark> <mark style="color:$primary;"></mark><mark style="color:$primary;">(Pledge #) in any entry will open that transaction record.</mark>*

<figure><img src="/files/2WqNOMnQkDROPMPmyg1o" alt=""><figcaption></figcaption></figure>

<details>

<summary><strong>Pledge Transaction record</strong></summary>

The transaction record will display **all** the information for that pledge.&#x20;

There are several actions that you can take:

<figure><img src="/files/3oICDfBOCdO4RDdMOK71" alt=""><figcaption></figcaption></figure>

* **Edit** pledge<img src="/files/VmnZPUvLYzFMak0gYjab" alt="" data-size="line">
* [New Transaction / Add Reminder](#create-new-transaction-reminder)  <img src="/files/qGMdZvNXor5CfgO0iY0Z" alt="" data-size="line">
* **Actions** - Print/Text/Email/Mail bills or void the pledge <img src="/files/WO7v68DL21OzsVgvF9fR" alt="" data-size="line">
* You can also pay the pledge by pressing this button: <img src="/files/o9dIClhzW98P3dRj9Jk5" alt="" data-size="line">

</details>

***

## <i class="fa-hand-point-right" style="color:$primary;">:hand-point-right:</i> <mark style="color:$primary;">**Total Scheduled**</mark>&#x20;

This card displays the **total** [**scheduled payments**](#user-content-fn-3)[^3] and [**scheduled pledges**](#user-content-fn-4)[^4] from this donor.

Click the **Scheduled** card to open a window showing ALL records that make up the total.

*<mark style="color:$primary;">You will see</mark> <mark style="color:$primary;"></mark><mark style="color:$primary;">**separate tabs**</mark> <mark style="color:$primary;"></mark><mark style="color:$primary;">for the scheduled</mark> <mark style="color:$primary;"></mark><mark style="color:$primary;">**payments**</mark> <mark style="color:$primary;"></mark><mark style="color:$primary;">and the scheduled</mark> <mark style="color:$primary;"></mark><mark style="color:$primary;">**pledges**</mark><mark style="color:$primary;">.</mark>*

In this window, you can:

<figure><img src="/files/RqY2D94pXVDLGaNZ7CxF" alt=""><figcaption></figcaption></figure>

* **Search** entries
* Filter by time frame via **All Time** field
* Choose how many **Entries** to show per page
* **Filter** by scheduled status. By default, the list displays transactions with a **Scheduled**  status.\
  Click the Schedule status field to view the full list of statuses, then select the desired ones.
* **Fields** - Adjust visible **columns**

*<mark style="color:$primary;">Clicking the</mark> <mark style="color:$primary;"></mark><mark style="color:$primary;">**purple hyperlink**</mark> <mark style="color:$primary;"></mark><mark style="color:$primary;">(Schedule #) in any entry will open that transaction record.</mark>*

<figure><img src="/files/JFGNRhoeSxS96gbpNem8" alt=""><figcaption></figcaption></figure>

<details>

<summary><strong>Scheduled Transaction record</strong></summary>

The transaction record will display **all** the information for that scheduled payment/pledge.&#x20;

There are several actions that you can take:

<figure><img src="/files/LoLRDryQFwR6w08t6baM" alt=""><figcaption></figcaption></figure>

* **Edit** schedule<img src="/files/VmnZPUvLYzFMak0gYjab" alt="" data-size="line">
* [New Transaction / Add Reminder](#create-new-transaction-reminder)  <img src="/files/qGMdZvNXor5CfgO0iY0Z" alt="" data-size="line">
* **Actions** - Cancel or pause the schedule <img src="/files/WO7v68DL21OzsVgvF9fR" alt="" data-size="line">

</details>

***

## <i class="fa-hand-point-right" style="color:$primary;">:hand-point-right:</i> <mark style="color:$primary;">**Total raised**</mark>

This card displays the combined **total** of all cards, representing the total donations contributed by this donor.

[^1]: In terms of a donation, a payment is the money or contribution given by a donor.

[^2]: A promise to donate money in the forseeable future.

[^3]: A scheduled payment is a payment set to be processed automatically on a specific date or at regular intervals, such as weekly or monthly. On each scheduled date, the donor’s card is automatically charged.

[^4]: A scheduled pledge is a planned, recurring pledge commitment.\
    Each occurrence creates an open pledge (invoice) that the donor is responsible for paying.


# Update a Donor


# Usage & Examples

<figure><img src="/files/PBIwA8A7VAx7osTGXICE" alt=""><figcaption></figcaption></figure>


# Glossary

<table><thead><tr><th width="253">Term</th><th>Definition</th></tr></thead><tbody><tr><td><strong>Campaigns</strong></td><td>The cause and purpose of the donation. Every donation is directed towards a specific cause AKA campaign.</td></tr><tr><td><strong>Collectors</strong></td><td>AKA fundraisers. Individuals that actually collect the money and donations.</td></tr><tr><td><strong>Donation page</strong></td><td>A dedicated online page, accessible via a unique URL, where donors can make donations to the organization (We call it our Webgive page).</td></tr><tr><td><strong>Donors</strong></td><td>Individuals who have donated or are committed to donating money in the future.</td></tr><tr><td><strong>Locations</strong></td><td>Where the donation was made.</td></tr><tr><td><strong>Minyanim</strong></td><td>This feature works in conjunction with the Pocket Processor. Its purpose is to inform the collector of the specific locations associated with the different minyanim.</td></tr><tr><td><strong>Payment</strong></td><td>In terms of a donation, a payment is the money or contribution given by a donor.</td></tr><tr><td><strong>Pledges</strong></td><td>A promise to donate money in the forseeable future.</td></tr><tr><td><strong>Reasons</strong></td><td>A team in a charity drive (Donate +). Each team has an online page with a fundraising goal.</td></tr><tr><td><strong>Schedules - Payment</strong></td><td>A scheduled payment is a payment set to be processed automatically on a specific date or at regular intervals, such as weekly or monthly. On each scheduled date, the donor’s card is automatically charged.</td></tr><tr><td><strong>Schedules - Pledge</strong></td><td>A scheduled pledge is a planned, recurring pledge commitment.<br>Each occurrence creates an open pledge (invoice) that the donor is responsible for paying.</td></tr><tr><td><strong>Sources</strong></td><td>This refers to all endpoints where transactions are processed and captured, including all devices, links, phone extensions, and more.</td></tr><tr><td><strong>Tokens</strong></td><td>A token is a value provided by the processing company. It represents the credit card that the donor has saved with the processor.</td></tr><tr><td><strong>Transaction</strong></td><td>The actual transaction, which can be a scheduled payment, a pledge or a payment.</td></tr><tr><td><strong>Webgive page</strong></td><td>A dedicated online page, accessible via a unique URL, where donors can make donations to the organization (also known as a Donation page).</td></tr><tr><td><strong>נדרים ונדבות</strong></td><td>These are promises to donate money - promises made when one is עולה לתורה.</td></tr></tbody></table>


# Pocket Processor

<figure><img src="/files/9Ln2F34OOL0t2lwcUsNH" alt=""><figcaption></figcaption></figure>